Throughout history, the effective range and precision of firearms have rapidly improved. In the era of smoothbore muskets, a skilled marksman might struggle to hit a man-sized target every time at 100 yards. With the introduction of rifled barrels and the transition from round musket balls to conical Minié balls, the same shooter could achieve reliable hits at double or triple this range. Improvements to metallurgy, machining, cartridge production, and magnified optics throughout the 20th century doubled and tripled this effective range yet again. Today, we’re at the point where a shooter with scoped carbine skills and an inexpensive, off-the-shelf AR-15 can get consistent hits at close to 1,000 yards with mass-produced ammunition. That’s an impressive feat, but it also leads to a question: Are you, the shooter, capable of matching the potential of your carbine?
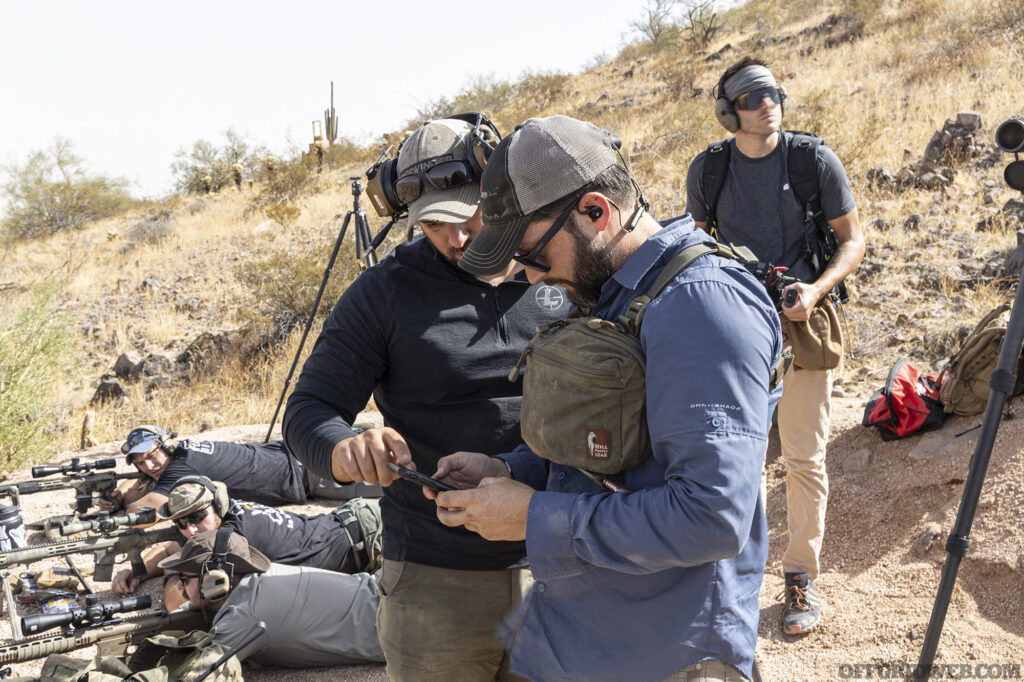
To learn how to make the most of an AR at extended range, I took a Scoped Carbine class from Sidewinder Concepts. Adrian Leatherman, the founder of Sidewinder, is a recently retired U.S. Army sniper who teaches students based on his real-world experience. This class was hosted by local ammo manufacturer Badlands Munitions Co. on a private piece of land in the Arizona desert.
My Rifle & Ammo
Less-Than-Ideal Choices
The course description mentioned an emphasis on targets at 600 yards and closer, so I decided to bring my 13.9-inch AR with a Vortex Razor HD Gen III 1-10x optic, pictured below. I knew from previous experience (e.g., the TruKinetics LPVO class I wrote about in Issue 54) that I could ring steel at 600 yards with this rifle consistently, even with 55-grain .223 ammo. However, one of my first lessons from this class was that this rifle — albeit a very versatile setup based on high-quality parts — began to show its weaknesses at that range in anything other than ideal weather conditions, especially without heavier match-grade ammo.
We experienced strong gusty winds throughout the class, to the point that tripods were falling over and students were having to make substantial wind corrections before shooting. The 55-grain ammo I brought simply wasn’t stable enough after exiting the 13.9-inch barrel to cut through that wind, so I spent most of the day missing left and right of targets beyond 500 yards. Put simply, this wasn’t the right tool for the job.
I took this lesson to heart and decided to build a second upper receiver that’s optimized for 77-grain ammo and longer range — more on that project later in this article.
Configuring a Scoped Carbine
During the classroom portion of the Sidewinder Concepts class, Leatherman discussed some of his recommendations for scoped carbine setups:
- Length of Pull (LOP) – While holding the pistol grip, adjust the stock until it’s long enough to reach just past the inner crook of your elbow. Get behind the gun and make sure the angle of your wrist is comfortable, and that you have a good 90-degree finger placement on the trigger.
- Scope Placement – Position the optic on the Picatinny rail an appropriate distance away from your eye, ensuring that you have a full sight picture without any scope shadow at the edges. Try getting comfortable behind the rifle with eyes closed, and then open your eye to confirm sight picture.
- Mount Height and Comb Height – Make sure you can get a completely relaxed, stable cheek weld against the stock with full sight picture. If not, a lower scope mount or taller cheek riser may be necessary. However, don’t go too tight; pressing your cheek forcefully into the stock induces muscle tension, and tension is bad for precision.
- Ocular Focus – Aim your optic at the sky or a blank white surface and adjust the rear focus ring so the fine details of the reticle are perfectly sharp. Open and close your eye a few times to confirm this and check it at all magnification levels. Consider marking it with a paint pen in case another shooter (e.g., a family member or friend) needs to adjust it temporarily.
Above: This 13.9-inch upper is a jack-of-all-trades, but it wasn’t the ideal tool for shooting beyond 500 yards, especially in strong wind.
Behind the Gun
To check my rifle configuration, I got into the prone position, ensuring my spine was at the same angle as the rifle barrel. Feet are spread apart with heels flat on the ground, and arms form an A-frame, with the support hand squeezing a sandbag beneath the buttstock to control elevation. Controlling the bag is absolutely critical to controlling the rifle, and loosening your grip on it will lead to misses, much like loosening your support hand grip on a handgun. Use your support hand’s index finger and thumb to grip the stock, and the other three fingers to manipulate the bag. I found I prefer a larger sandbag, since it fills the void between my chest and the rifle and offers much more structural support. For bipods, height should be adjusted to a point where you don’t feel neck tension while holding the reticle on target. Leatherman emphasized the importance of being entirely comfortable and relaxed in this position.
As for your sight picture, remember that you should see zero scope shadow before taking a shot. Some optics have a tighter eyebox (i.e., less space for an acceptable eye placement behind the scope), and Leatherman says that’s actually a good thing for precision, since it forces you to achieve a consistent sight picture every time. Optics with forgiving eyeboxes, such as LPVOs, are good for fast shooting but may lead to inconsistency at longer range. Checking cant — the left-to-right angle of your carbine — is another important part of this process. Use a weapon-mounted bubble level to confirm your reticle is perfectly upright, because even a 2- or 3-degree cant can lead to misses on a human-sized target at longer ranges.
The firing hand grip can be either precision (thumb up) or traditional (thumb wrapped around); Leatherman says both can work well, but he prefers traditional grip for an AR with a telescoping stock. When it’s time to pull the trigger, pin it to the rear and release after you see what happens downrange. This makes corrections and follow-up shots easier.
To remember all of these steps, use the acronym BRASS:
- Breathe – use the natural respiratory pause at the bottom of an exhale
- Relax – don’t hold your breath or put any muscle tension into the gun
- Aim – let the reticle fall onto the target as you finish exhaling
- Sight – confirm clear sight picture
- Squeeze – gently break the trigger
“Don’t accept a bullsh*t zero,” Leatherman emphasized. Ballistic calculators — which we’ll discuss more later — assume that your zero is perfect, so any deviation here will throw off all the data down the line. To zero my rifle, I set up on a tripod and aimed at the corner of a 1-inch box on the paper target. This serves as a highly precise aiming point and allowed me to see deviation clearly, as opposed to simply accepting any hit within the box.
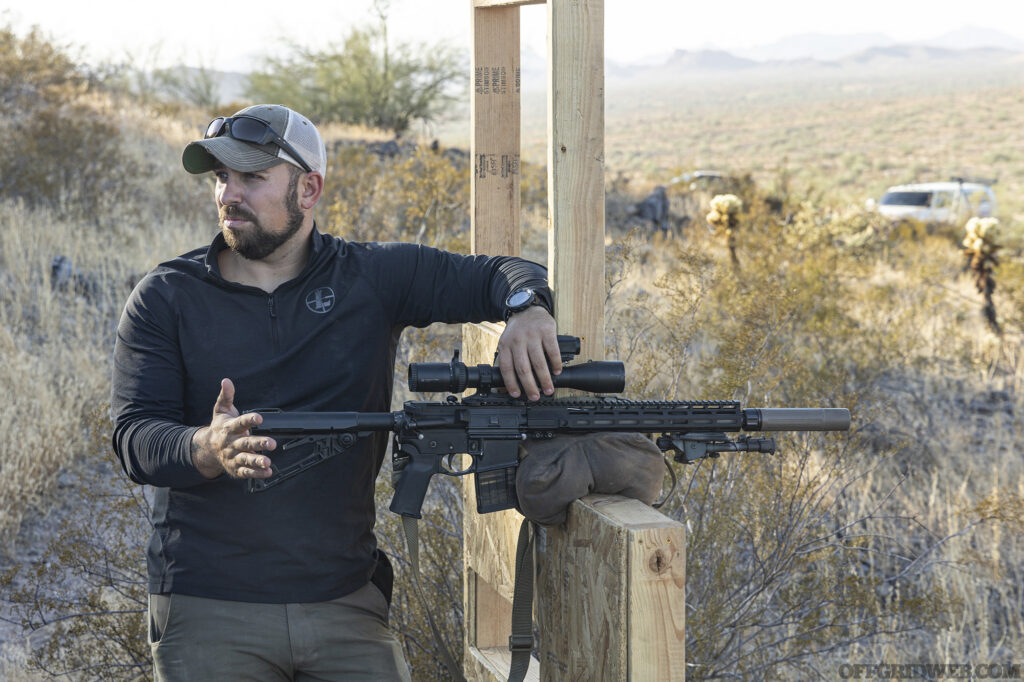
Above: Adrian Leatherman, founder and lead instructor of Sidewinder Concepts, bases his curriculum on nearly a decade of experience within the U.S. Army Reconnaissance and Sniper community.
The Flight of a Bullet
In order to understand precision shooting, you need to understand what a bullet does after it leaves the barrel of your carbine. This can be summarized in three stages:
- Supersonic – The bullet is traveling above the speed of sound, which makes its behavior relatively easy to predict.
- Transsonic – The bullet has slowed into a transitional range (Mach 1.2 to 0.8) that generates areas of supersonic and subsonic airflow around it. As a result, it can behave very unpredictably. Leatherman calls this “the f*** you zone.”
- Subsonic – As airflow around it slows entirely below the speed of sound, the bullet’s behavior becomes more predictable again.
The dividing line between supersonic and transonic is generally known as “maximum effective range” because all variables up to that point are reasonably measurable and controllable. Faster-moving projectiles will remain supersonic for longer, thereby extending the max effective range. Beyond the caliber, barrel length, ammunition, and atmospheric conditions can also dramatically affect this.
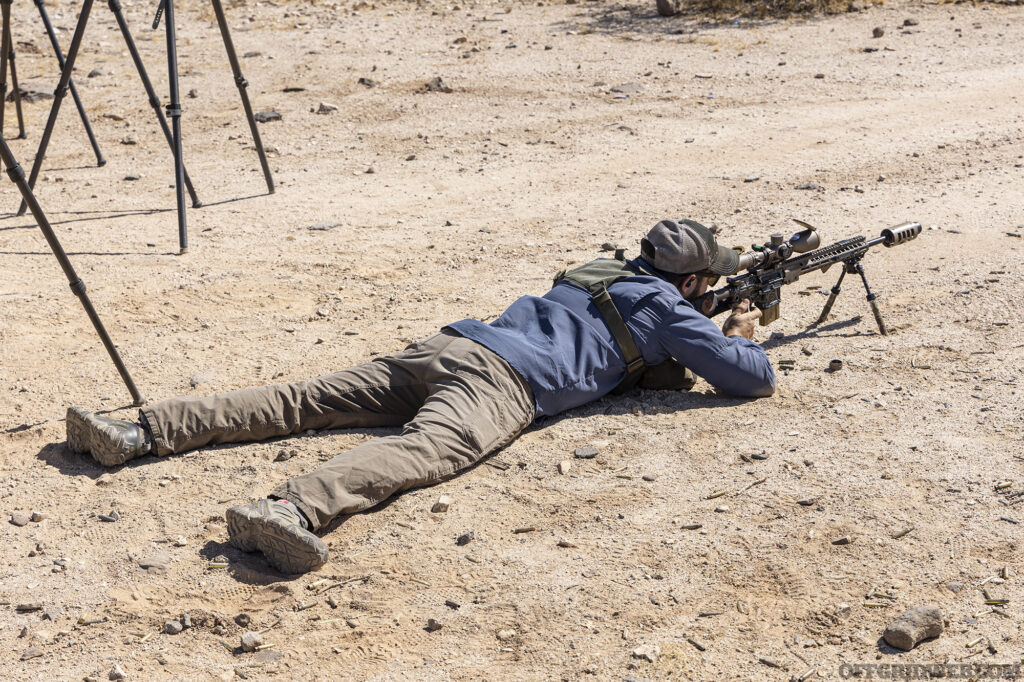
Above: RECOIL OFFGRID contributor Nate Gerhart demonstrates proper prone form, with heels flat, legs apart, and support hand gripping a shooting bag beneath his chest to control the carbine’s elevation.
Here’s a quick and dirty max effective range reference guide for some common calibers:
- .223/5.56 – 600 yards
- .308 – 850 yards
- 6.5 Creedmoor – 1,250 yards
Leatherman says that if you want to manually calculate the speed at which a bullet enters the transonic range, also known as Remaining Velocity (RemV), you can use these formulas:
- Speed of Sound (SOS) in feet per second = 1061 + current temperature in Fahrenheit
- Remaining Velocity (RemV) = SOS x 1.2
So, for example, if it’s 60 degrees F outside, the speed of sound should be roughly 1,121 feet per second. The real SOS formula is much more complex and yields a value of 1,117 fps, but 1,121 is close enough for our purposes. The upper end of the transonic range is typically Mach 1.2, so we multiply our speed by 1.2, which gives us a RemV value of about 1,345 fps. As long as a bullet is traveling faster than that speed, its trajectory should remain relatively predictable.
Thankfully, we don’t need to do this math manually. During the class, Leatherman taught us to use the Applied Ballistics app to quickly calculate the trajectory and holdover points for a specific day at the range. I entered the barrel twist rate, sight height, and reticle/adjustment units (MIL or MOA), followed by the bullet diameter, weight, length, and distance at which my rifle was zeroed. After testing my ammo at the range with a chronograph, I entered 2,910 fps for the average muzzle velocity. Finally, I typed in the atmospheric data for the range that day: altitude, temperature, and humidity. Wind speed was left at 0 miles per hour, since I’d need to correct for that on the fly while shooting.
For my rifle, the AB app indicated max effective range would be about 500 yards. Beyond that point, the bullet will enter the transonic range below 1,345 fps, and the shot groups will start opening up substantially.

Above: Each student’s rifle was zeroed and chrono’d at the range before we started shooting. These steps ensure a clean slate upon which ballistic data tables can be built and confirmed.
Keeping It Real
With all this data, we can predict the trajectory of a bullet and maximize our chances of hearing that satisfying “ding” as it makes impact on a distant steel plate. On a good day, you can have a lot of fun ringing steel at more than 1,000 yards with a plain-Jane 16-inch AR-15 and lightweight .223 ammo. The holdovers and wind corrections may be substantial, but with a ballistic calculator, good data, and solid shooting technique, it’s doable.
However, as Leatherman explained, “There’s a difference between fun and realistic.” Just because the ballistic data says you can hit the target does NOT mean that the round’s lethality will be maintained at that range. Lethality is unimportant for plinking and competition, but absolutely critical for hunting or combat. To gauge this, we should examine the bullet’s energy, typically measured in foot-pounds. Leatherman says that the amount of energy required to maintain reliable lethality varies based on the target:
- Big-game animals (e.g., elk or bear) – 1,000 ft-lb
- Other animals (e.g., deer) – 600 ft-lb
- Humans – 350 ft-lb
Considering these energy requirements, my rifle’s realistic effective range with 55-grain ammo would be more like 375 yards for two-legged threats and 200 yards for game animals. With 77-grain match ammo at a muzzle velocity of 2,500 fps, the AB app indicates those ranges are extended to about 500 and 275 yards, respectively.
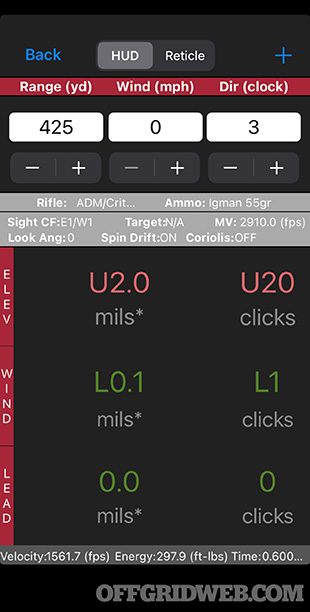
Above: A smartphone and ballistic app such as Applied Ballistics is invaluable to a modern sniper. Simply enter all the variables, and the app indicates the necessary elevation holds at various distances.
Wind: The X-Factor
Now that we understand max effective range (the most predictable portion of the bullet’s arc through the air) and practical lethality (the bullet’s energy on target), we need to consider one final factor that can reduce both. Wind can be unpredictable due to its constantly changing speeds and angles. It flows like water over terrain, and the speed of the wind near your target may be completely different than the speed of the wind where you are. As a result, even the best ballistic calculators won’t be able to tell you the exact left or right hold in the pivotal split second before you squeeze the trigger.
Learning to call the wind and estimate an appropriate correction is a skill that takes time and practice, but Leatherman says there are a few things you can do to reduce its impact on your shooting performance.
Know Your Rifle’s Number
Heavy, high-velocity bullets are more resistant to being pushed around by the wind. Some calibers will be affected noticeably by a smaller amount of wind, while others will require a larger amount. The crosswind speed required to blow your bullet left or right by 0.1 MIL at 100 yards (or 1 MIL at 1,000 yards) is called a “gun number” or “gun mph.” Here’s a quick approximation for common calibers:
- .223/5.56 – 3 mph
- .308 – 5 mph
- 6.5 Creedmoor – 7 mph
Once you’ve determined your rifle’s number, it’s easier to compensate for wind based on speed brackets. For a 5-mph gun, you should know corrections for 5, 10, and 15 mph full-value (90-degree) crosswinds, rather than everything in between. Speaking of which …
Make a Wind Chart
Rather than relying on a Kestrel or other wind speed meter to do all the work, take notes about wind speed and corrections every time you shoot in windy conditions. Compile this data into a paper chart or integrate it into your rifle’s existing DOPE chart.

Above: Students brought a variety of rifle setups to test on targets from 200 to over 800 yards. The first half of the day was spent on prone shooting.
Befriend Your Biggest Fan
Leatherman learned to gauge wind speed by setting up a box fan and guessing how fast the wind was blowing based on how it felt. After a guess, he would use a wind meter (such as a Kestrel) to see how close he was. With enough practice, he was able to estimate wind speeds more accurately.
Read the Environment
To estimate wind downrange, you can look at the direction the mirage in the air is blowing. With no wind, mirage will travel straight up from the ground. At 1 to 3 mph, a slight angle will be visible in its distortion; at 4 to 7 mph, it’ll travel at a 45-degree angle in the direction of the wind. At 8 to 12 mph, mirage distortions will appear almost horizontal. Movements of tall grass and trees can also be a good indicator, but plant varieties behave differently, so you’ll need observational experience to know how your local foliage moves at certain wind speeds.
Be a Spotter
Shooting will help you hone your wind calling skills, but spotting for another shooter lets you truly focus on the visual aspect of wind corrections.
A Sniper’s Definition of CQB
In a combat environment, Adrian Leatherman says that snipers generally maintain a 500-yard bubble around their position. Outside that “danger close” range, they can call in air strikes; inside that range, they’ll need to use their rifles. One statement that stuck with me was “CQB is 300 yards and in” — in other words, Leatherman considers any armed threat within three football fields to be a close-quarters battle. His reasoning is simple: An untrained shooter can still hit you with relative ease at that distance, since no substantial holdover or understanding of ballistics is required.
That said, don’t assume an enemy combatant will perceive your presence the same way. Near the start of the Global War on Terror, Leatherman said harassment fire was often effective at deterring enemy forces from 700 or even 800 yards. By the later years of the war, many insurgents were bold enough to get within 200 yards without fear of dying.
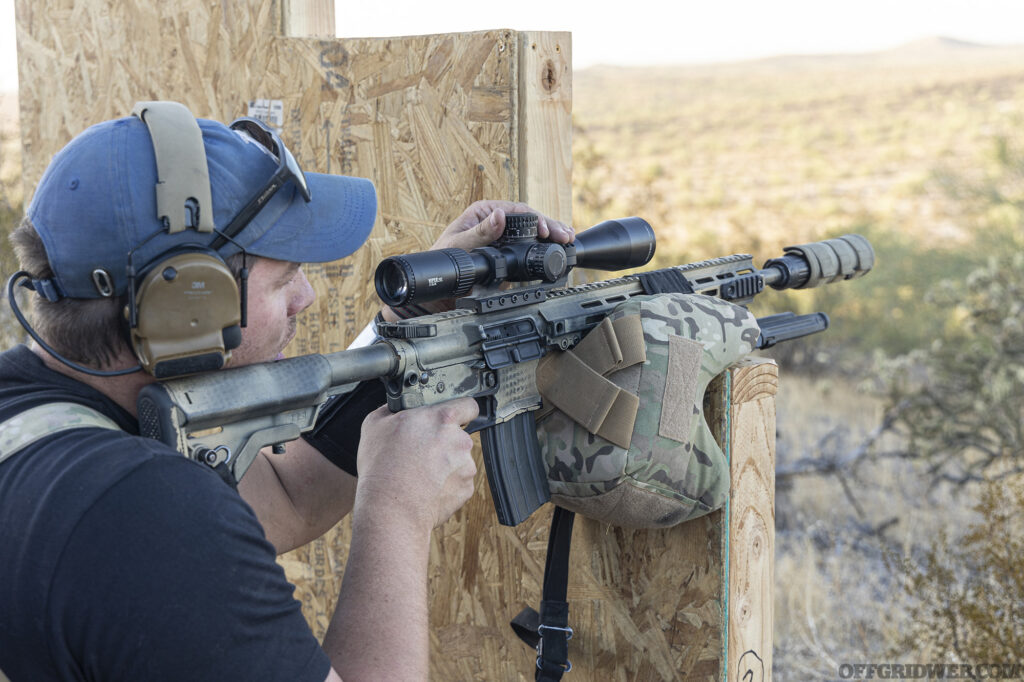
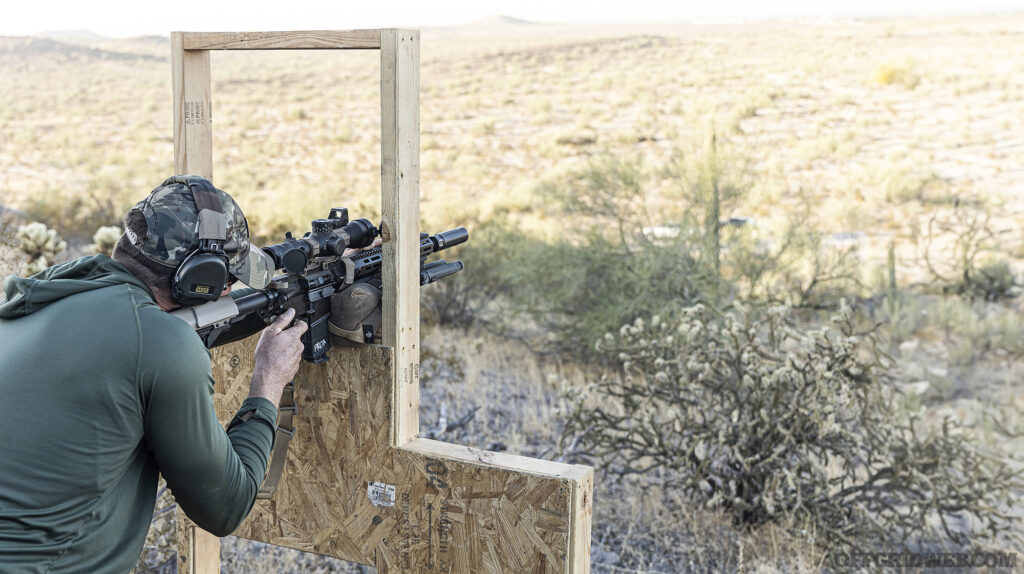
Above: Plywood barricades were set up to allow students to practice shooting skills from positions including standing, kneeling, and seated.
Building a Better Scoped Carbine
After completing the Sidewinder Concepts class, learning more about ballistics, and observing how my 13.9-inch rifle performed in windy conditions, I decided it was time to build another upper receiver tailored to engagements beyond 500 yards. This isn’t a replacement, it’s simply a different tool for a different purpose. Just as it’s nice to have a fully stocked toolbox in the garage, I like to have a variety of weapons in my gun safe — both are forms of preparedness.
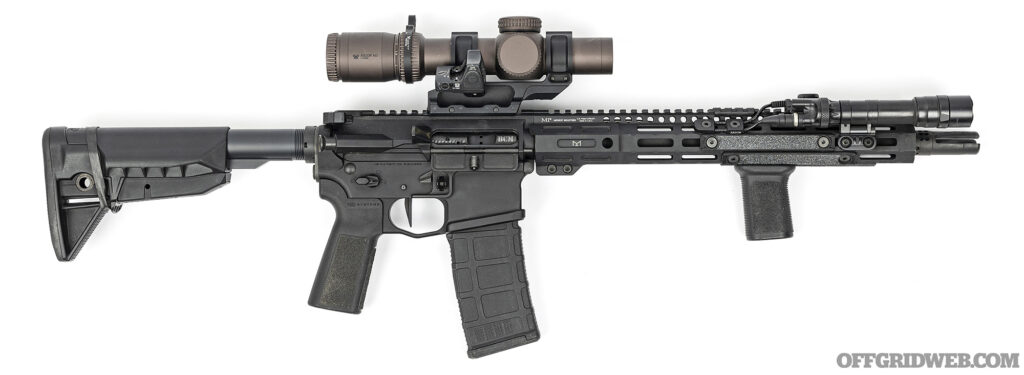
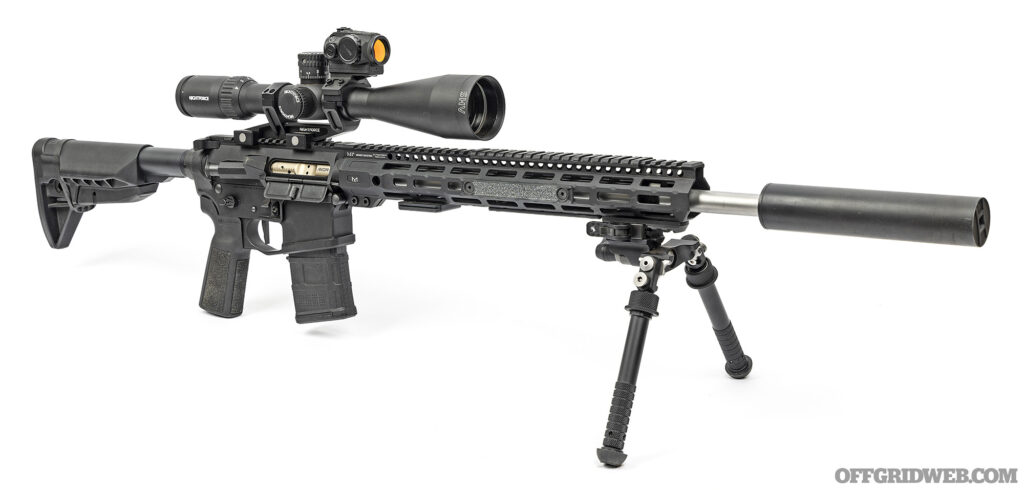
As we established earlier, more velocity can produce improved stability (more likelihood of hitting what you’re aiming at) and higher energy on target (more lethality). Aside from switching calibers, one of the easiest ways to achieve higher velocity is with a longer barrel. Obviously, there are diminishing returns with barrel length, and I don’t want to lug around a massive 24-inch rifle, so I chose a Rosco Purebred 18-inch SPR barrel. This barrel drew inspiration from one of the most iconic scoped carbines in modern military history, the U.S. Navy Mk 12 Special Purpose Rifle (SPR). Built from scratch at Rosco’s Rhode Island facility from a blank piece of 416R steel, it features a balanced SPR barrel profile and a rifle-length gas port that’s sized for use with a suppressor and common precision ammo.
This barrel was paired with an American Defense Mfg. UIC billet upper receiver to match the rifle’s existing lower, as well as Rosco’s Melonite gas tube and non-adjustable gas block. The muzzle device is a Gemtech two-chamber brake that’s compatible with my Gemtech Shield quick-detach titanium suppressor.
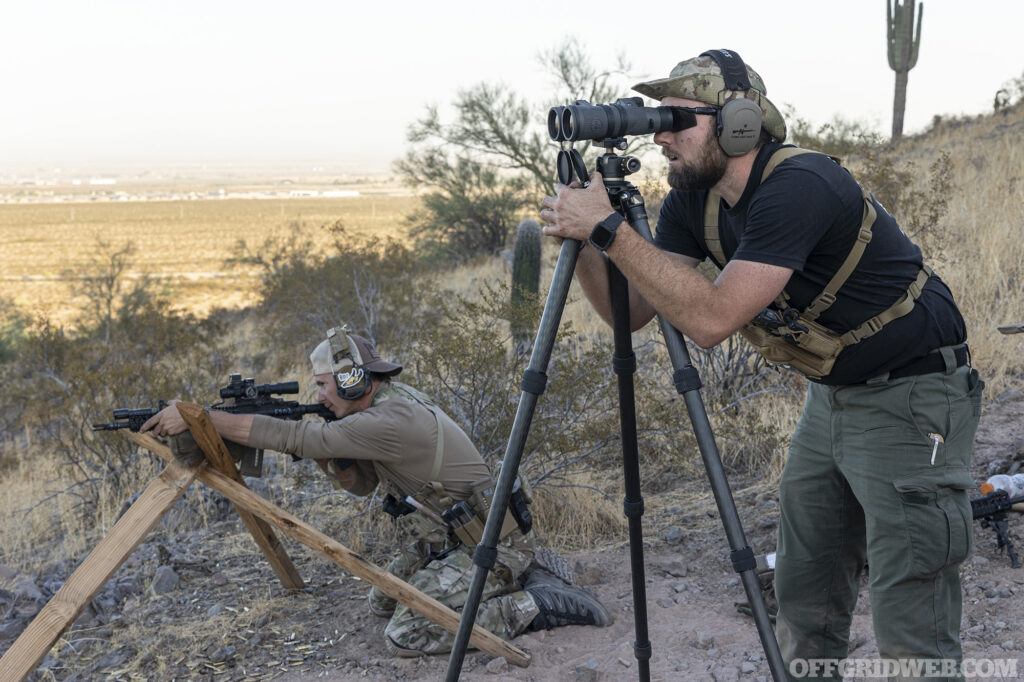
Above: You can learn a lot by serving as a spotter for a friend who’s shooting, especially when it comes to observing foliage and mirage movements to read the wind.
For the handguard, I went with a Midwest Industries 15-inch Combat Rail and equipped it with an Atlas BT65-LW17 Gen. 2 CAL bipod. This American-made bipod offers excellent stability, precise length and angle adjustments, a Pod-Loc adjustable cant system, and an American Defense Mfg. QD mount that makes it easy to swap onto any rifle with a Picatinny rail. Much like my 13.9 upper, there’s also an Ulfhednar M-LOK to ARCA rail adapter that enables use with a shooting tripod, and a set of Walker Defense Research NILE grip panels on the rail. This rifle’s low-friction, flat dark earth DLC-coated bolt carrier group is also from Walker Defense Research. Subtle upgrades like the knurled OCKS screws on the gas key make this BCG a solid choice for long-term reliability.
Last but certainly not least is the optic — one of the most important parts of any precision rifle. I chose a Nightforce SHV 4-14x50mm F1 scope with MIL-XT first focal plane reticle. This “Christmas tree” style reticle is a new addition to Nightforce’s affordable SHV line, and its highly detailed grid of 0.2-MIL dots provides exactly the level of detail I need for precise elevation and wind holds. Of course, the glass and overall build quality are superb, as I’ve come to expect from a Nightforce scope.
Since this is a mid-power variable optic (MPVO), it doesn’t offer a 1x setting, a feature I prefer for quick target acquisition. If you’ve ever lost a target in the scope and had to sweep back and forth looking for it, you know what I’m talking about. An unmagnified red dot can also serve as an alternative to backup iron sights, works well under night vision, and in a worst-case scenario, makes it easier to engage targets well within the 300-yard CQB range (see sidebar). For these reasons, I equipped the Nightforce Ultramount with a 12-o’clock piggyback red-dot adapter from Koeng. This mount bolts onto Nightforce’s optional RAP-I accessory platform, which was intended for a laser rangefinder, and repurposes it to an Aimpoint Micro-style footprint. In this case, I installed a Primary Arms SLX MD-20 red dot, but other sights from SIG, Vortex, or Holosun could also fit.
Rifle Sources
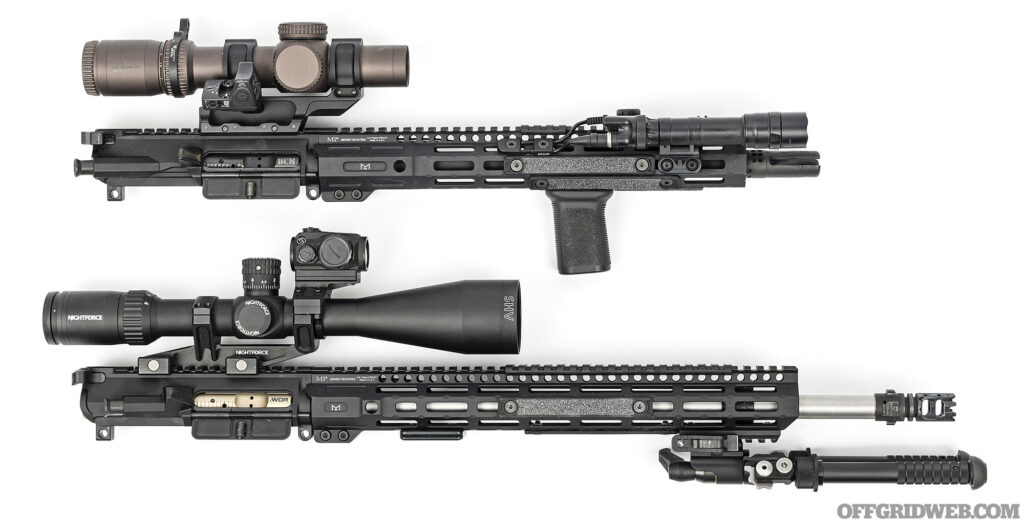
Above: Here’s a side-by-side of my old 13.9-inch upper and my new 18-inch setup. The longer barrel, more powerful optic, and rock-solid Atlas bipod are notable upgrades.
Training Sources
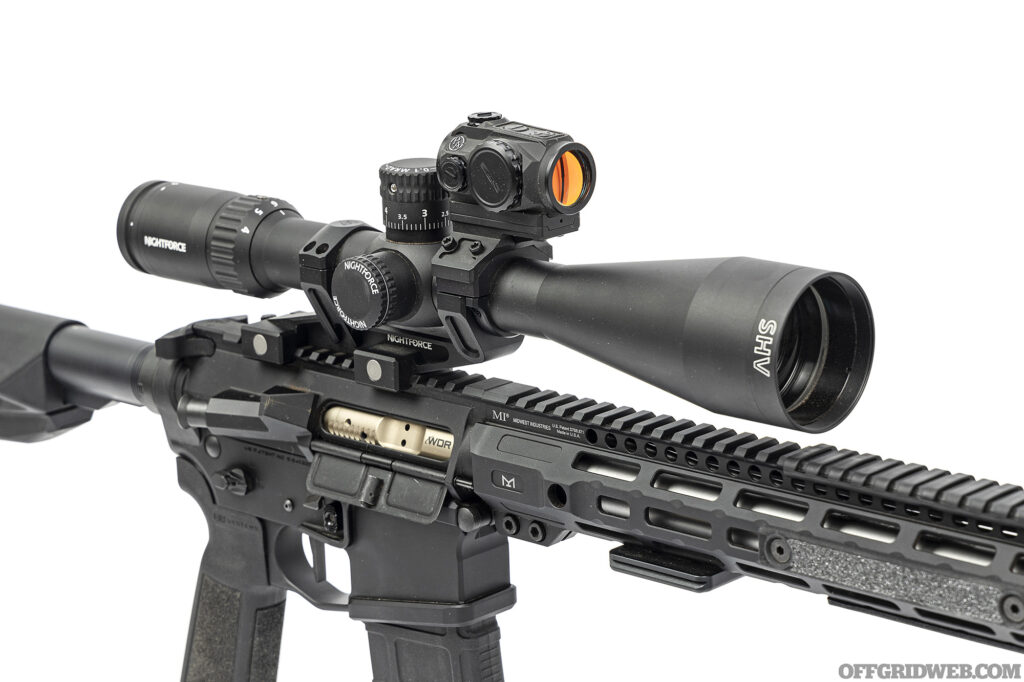
Above: The Nightforce SHV 4-14x50mm F1 is an outstanding optic for this application, especially with its new MIL-XT reticle. The 12-o’clock red-dot mount from Koeng paired nicely with it.
Closing Thoughts
Switching from a 13.9-inch barrel to an 18-inch barrel yielded roughly 200-fps higher muzzle velocity, extending the rifle’s max effective range from 500 to 575 yards with 55-grain ammo or from 575 to 650 with 77-grain match ammo. While this is a noticeable increase in effective range, it’s less than I expected. Lethality figures tell a similar story — the 13.9 maintains 350 ft-lb of energy out to 375 yards (55-grain) or 500 yards (77-grain), and the 18 increases that to 425 yards (55-grain) or 600 yards (77-grain).
Arguably, based on this data, there’s more benefit in switching your short-barreled rifle to heavier 77-grain match ammo than there is in building an upper with a 4-inch-longer barrel. Granted, the longer barrel will still be helpful for cutting through the wind, is more resistant to heat buildup from repeated shooting, and can offer improved penetration against closer targets. But contrary to popular assumptions, slapping a longer upper on your rifle doesn’t extend its effective range by 200 or 300 yards. In our case, it turned a 500-yard gun into a 600-yard gun.
If you’re looking to reach out and touch something beyond 600 yards, it can be done with a 5.56 scoped carbine, especially if you’re only concerned about hearing the “ding” of a steel plate as opposed to terminal ballistics or lethality. But as I lobbed rounds at 700-yard targets and fought gusting crosswinds during this course, my biggest takeaway was: “Man, I wish I brought my 6.5 Creedmoor AR-10.” Sometimes there’s just no replacement for a bigger, faster caliber.
Aside from choosing the rifle and ammo, most of long-range shooting comes down to your experience and skill as a shooter. This Sidewinder Concepts class helped me develop my understanding of a rifle’s ballistics, and more importantly, how ballistic data applies to real-life applications. Next time I need to shoot beyond 500 yards, whether that’s during a competition, a hunt, or just for fun, I’ll know what it takes to score a hit without relying on guesswork or volume of fire.
Read More
Subscribe to Recoil Offgrid's free newsletter for more expert tips and insights on staying prepared.
Editor's Note: This article has been modified from its original print version for the web.
The post Scoped Carbine Skills appeared first on RECOIL OFFGRID.
By: Patrick Diedrich
Title: Scoped Carbine Skills
Sourced From: www.offgridweb.com/preparation/scoped-carbine-skills/
Published Date: Thu, 25 Jul 2024 15:56:05 +0000
------------------------
Did you miss our previous article...
https://bushcrafttips.com/bushcraft-news/20-hygiene-products-to-stockpile-like-crazy
 What is BushcraftSurvival SkillsToolsVideosBushcraft CampsBushcraft KitsBushcraft ProjectsPrivacy PolicyTerms And Conditions