The sling is an ancient, and highly effective, projectile weapon and also one of the most versatile. Using nothing but skill and small projectiles in the form of stones or marbles, these innocuous, simple straps can propel their tiny missiles to lethal velocity, more than capable of bringing down man and beast with a good hit.
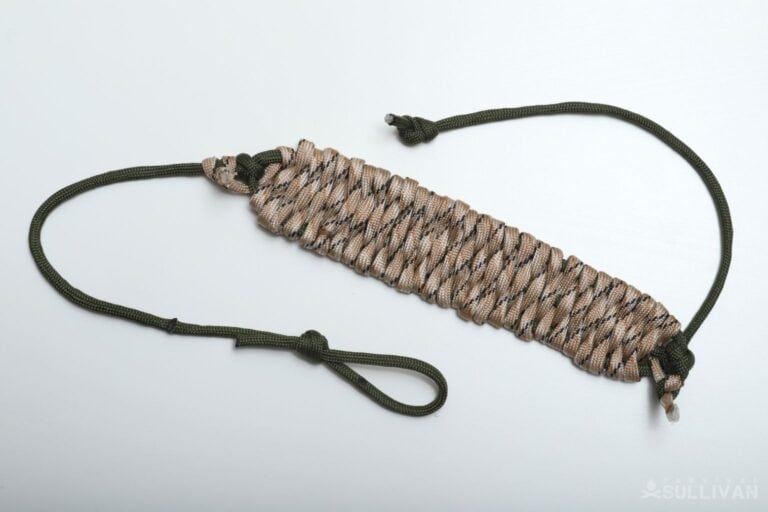
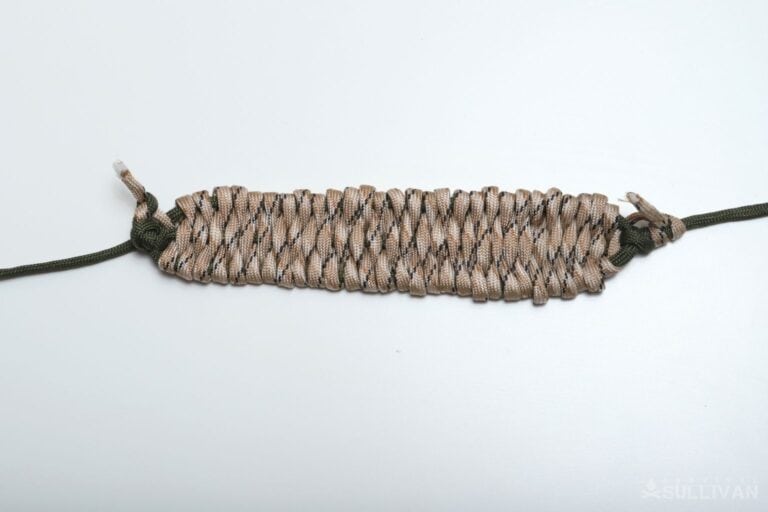
Paracord shepherd’s sling
Although left in the dustbin of history by the bow and arrow and, of course, the firearm later on, they still have utility because they are the ultimate in portable, ranged capability if you’re willing to put in the time to master them. And you can find stones everywhere, after all!
Paracord works wonderfully for making a sling both because it is ubiquitous and also because its strength-to-weight ratio is extraordinary.
With just a little bit of practice and time, you can even craft a sling in the middle of a survival situation. A good trick to know! Keep reading, and I’ll tell you how to do it step by step.
Tools and Materials
You need very little to execute this project: a little paracord, a cutting tool, a lighter, and a place to work.
Paracord, 14 feet: standard 550 paracord is what you need. You’ll either cut this one into one piece that’s 6 feet and another that’s 8 feet, or use two different pieces.
Just make sure it is in good shape and free of rot or damage that might compromise it once you have the sling loaded and you are whirling it around your head.
Scissors or Knife: any sharp tool capable of cutting the paracord is fine. Just make sure it will produce a clean cut as you don’t want ragged edges that might turn into runs in the sheath later.
Lighter: for melting and sealing the cut ends of the paracord.
Fid (optional): a bluntly pointed conical tool that can help you dress weaves and undo knots. Not strictly necessary for this sling project, but helpful to have around any time you’re working with Paracord.
Flat Work Surface: it’s possible to do this project right out of hand, but having a flat, clean, and clutter-free work surface makes a big difference when it’s time to start weaving the pouch. You can even use a good flat rock if you can find one or a tree stump, nothing fancy.
And that’s it! Told you you didn’t need much. We’ll get straight into the step-by-step below.
Making the Shepherd’s Sling, Step by Step
None of the following steps are time-sensitive, but nonetheless, I strongly recommend you review them all before you start so you have a better idea of how this project will progress.
Step 1: Cut two lengths of paracord. One 6-foot length, and one 8-foot length. We used two Paracord colors in this tutorial so it’s easier to follow the instructions, though the video at the end uses only one color.
Anyway, it’s up to you, but make the cuts at the ends as clean as you can i you go the first route. This will make securing the various steps with knots easier later. Do not seal the ends with your lighter!
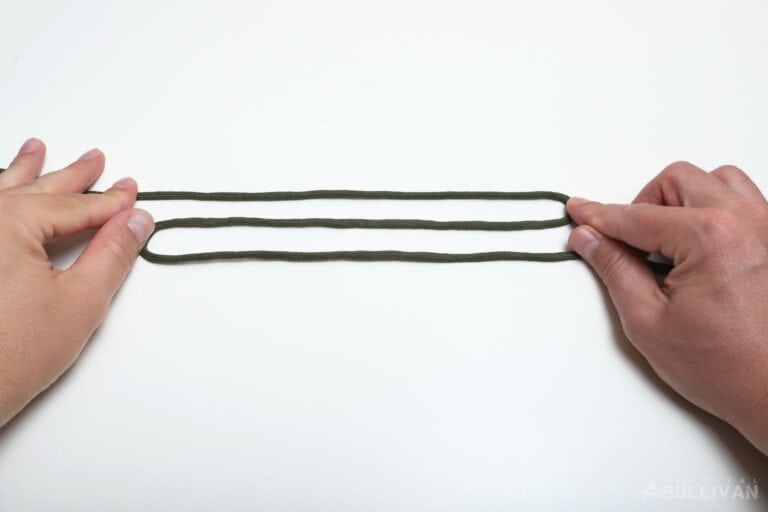
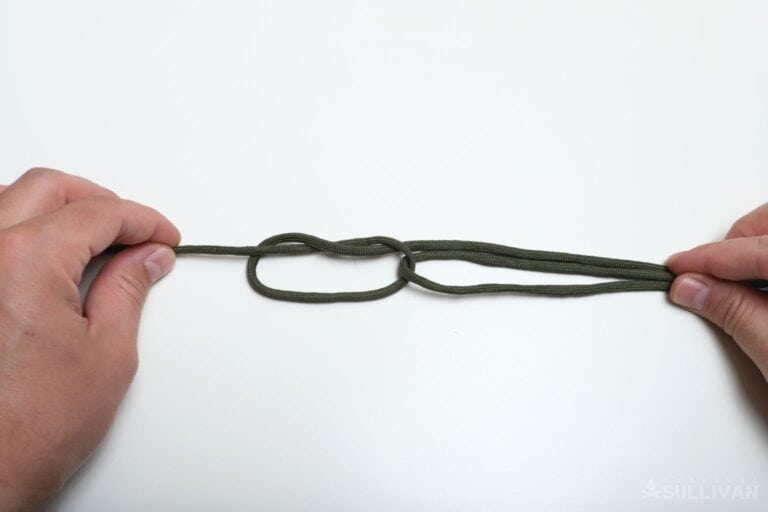
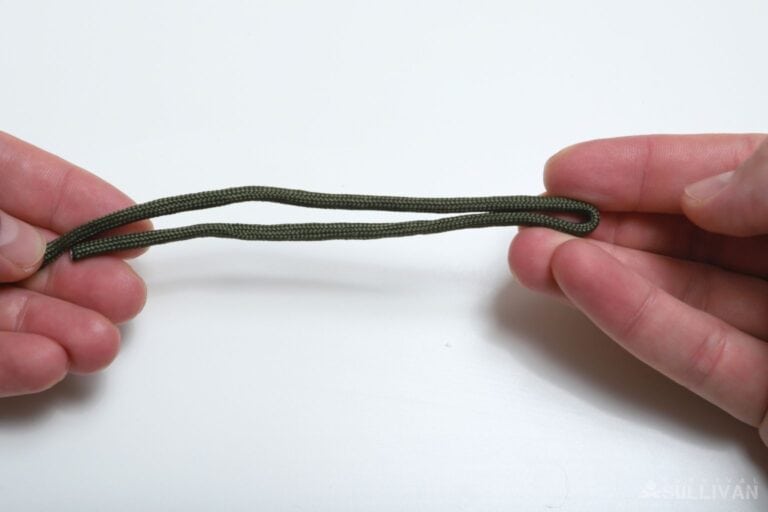
Step 2: Make bends in the middle of the shorter length. In the middle of the 6-foot length of paracord, make an S-shape; form a bend and lay out about 6 inches of cord. Repeat the process and make another bend in the opposite direction to form an S-shaped curve in the middle of the cord:
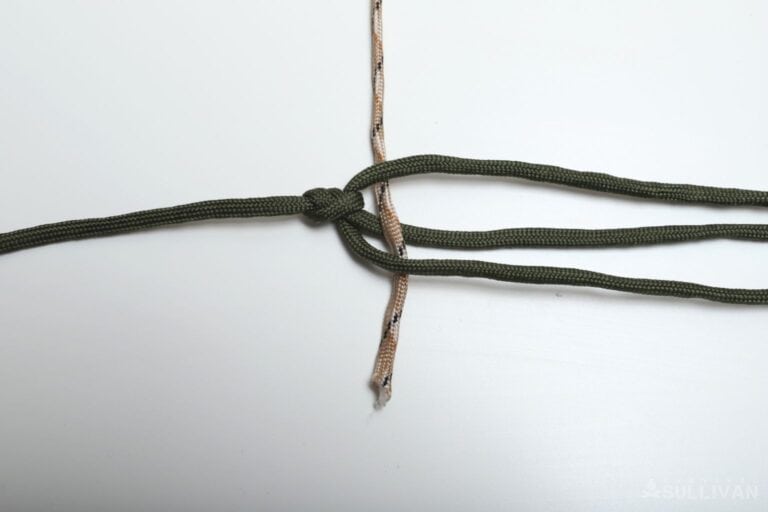
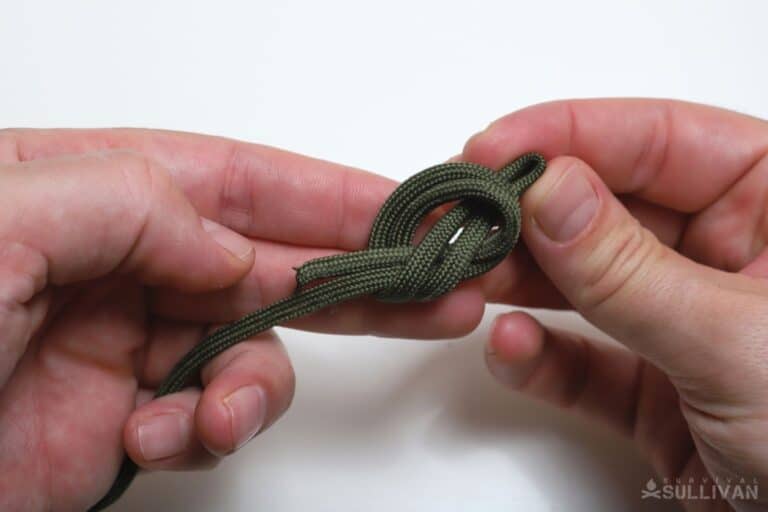
Step 3: Start to knot bends. Pass the standing end through the first bend in the “S”:
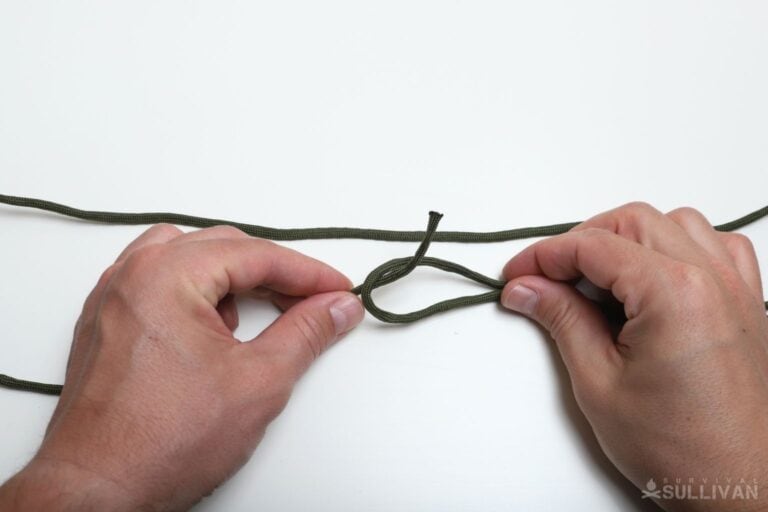
Step 4: Continue on. Bring that the standing end up and over the upper strand, curl it under, and bring it back down…
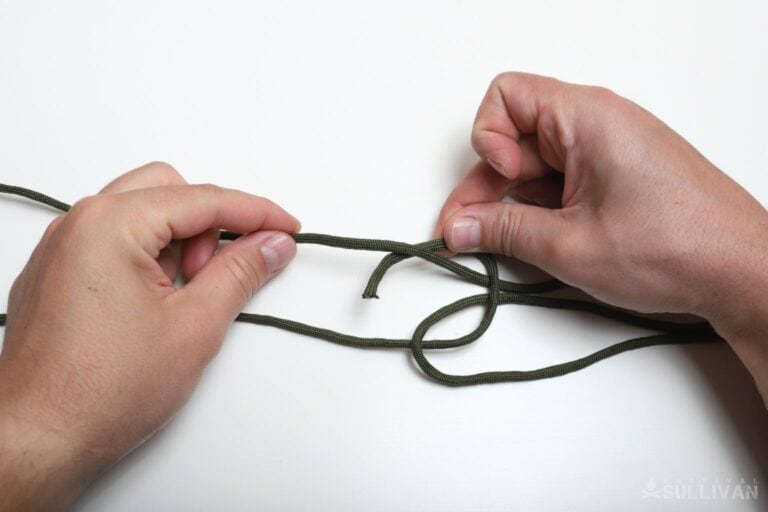
Step 5: Form knot. Bring the end up and through the loop you just formed:
Step 6: Continue on. Bring the end through the open knot you just formed one more time, passing it between the lower and upper strand as shown…
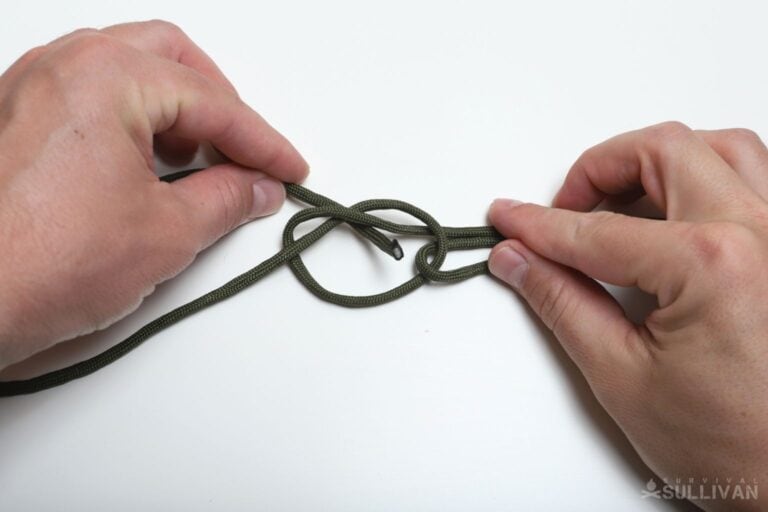
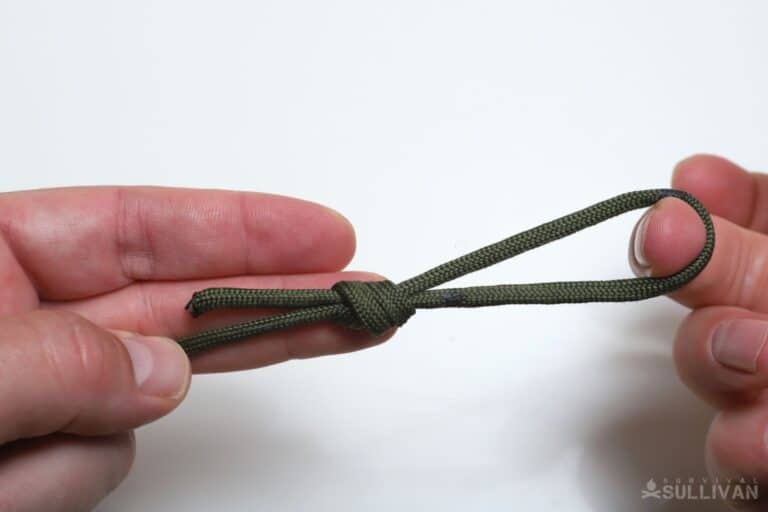
Step 7: Tighten. Pull on the standing end and the three parallel strands to tighten the knot and secure the strands in place. This forms the base of the pouch you will weave in the next steps…
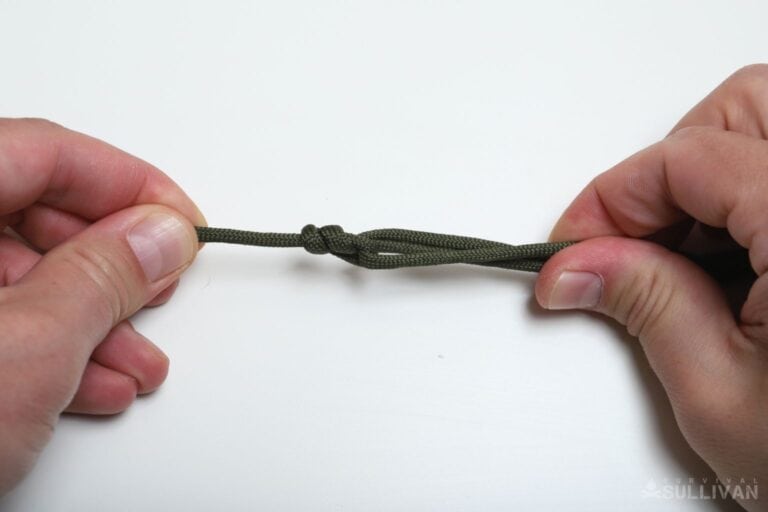
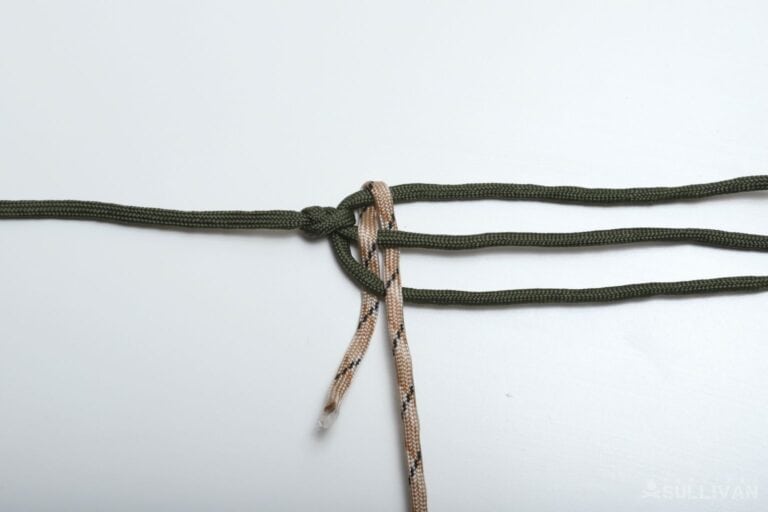
Step 8: Repeat steps 3 through 8 on opposite side of strands. Now take the opposite end of the cord that you’re working with and repeat the previous steps on the other side of the strands forming the pouch. Tie it off tightly with the same knot you just made.
Step 9: Dress knots, if needed. With the knots done, you should now have 3 parallel and roughly even strands in the middle of the 6-foot length of paracord, now forming the sling.
These strands form the foundation where you’ll weave the pouch in the next steps. If the strands are uneven or the knots aren’t tidy, redo them before moving on.
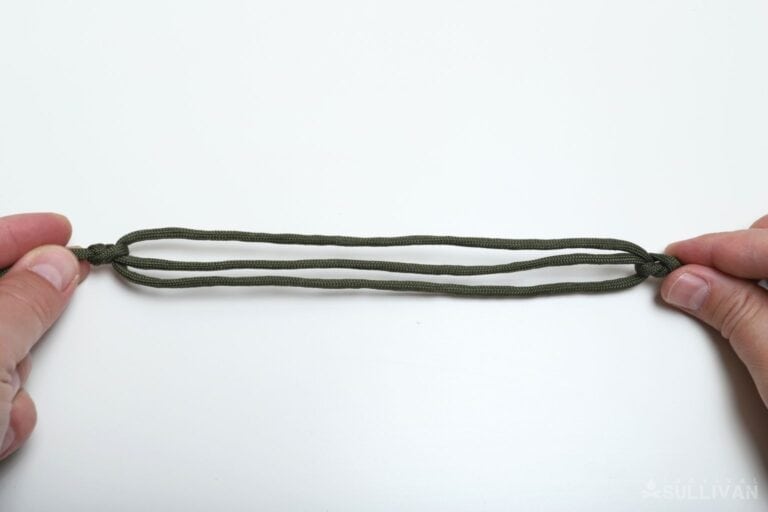
Step 10: Lay center strands flat and parallel. Lay out the beginning of the sling on your work surface and smooth it out.
If any one of the strands seems drastically shorter than the other, or if they will not lay flat, you didn’t keep your bends consistent in the previous steps. Untie those knots and redo them then come back.
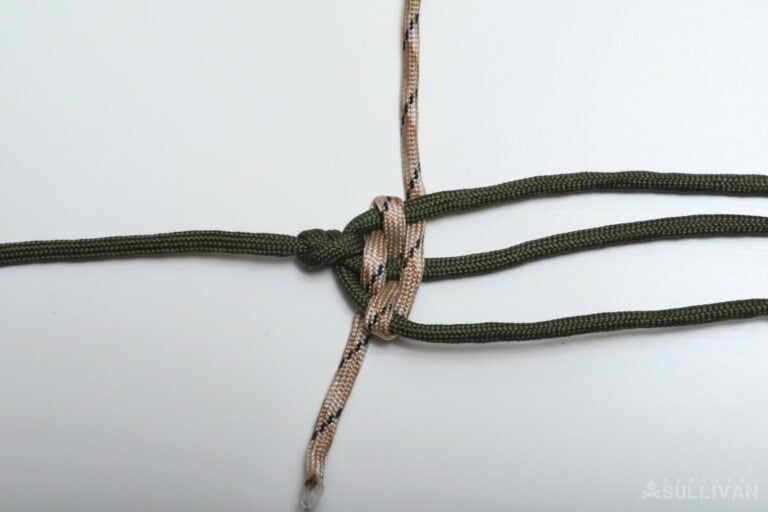
Step 11: Start the longer length of cord. Now it is time to weave the pouch. Grab the longer 8-foot length of cord.
Beginning at one end of the parallel strands we just made, right against the knot you tied, run the longer length of cord through the strands, leaving a “tail” about 4 inches long sticking out. This is critical for securing the finished weave!
Step 12: Start weaving. Go over the outer strand, under the middle one, then over the next. Check the pictures and video for reference; it is simple, I promise. Check the pic closely for reference:
Step 13: Dress weave. Keep an eye out for twisting and bunching during the following steps, and make all turns consistent and keep them snug for the whole process. Consistency is paramount going forward!
Step 14: Keep weaving. Now double the working end of the cord back and continue the weave, but reversing the order you pass over the strands: under the outer, over the middle, and under the next.
Step 15: Snug up cordage. Keep the successive passes of the cord compact, snug, and free of twists as you go. The cleaner your weaving, the better your sling will work!
After you make a couple of passes, it’s helpful to hold them in place with your free hand to keep them uniform while you complete the weave with your other hand. Just take care not to disturb your previous work.
Step 16: Continue. Repeat the previous weaving steps. Keep going until you reach the opposite knot at the end of the strands.
Note that you want to go as far as you can until you cannot possibly get another pass. Don’t leave a little gap or opening or else your pouch can open up and possibly let the projectile fall out in use!
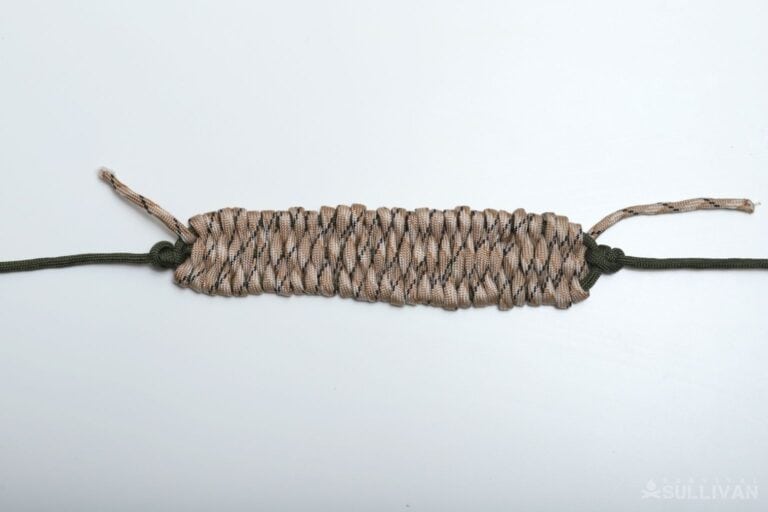
Step 17: Make sure everything is tidy; tie off tails. Once you can’t go any further with the weaving, assess your work.
Make sure everything is tight, tidy, and free of twists or kinks. Once it is, wrap the tail of the weave where you started around the standing part of the cord on that end and then tie it off with a simple knot to secure it.
Repeat the process with the tail where you just finished the weave on the opposite side, and trim it if necessary.
Step 18: Start thumb loop on longer end. Take a look at your completed sling. Though we tied the pouch in the middle to begin with, one end will definitely be longer.
Take this longer side and, at the very end, make a bend about 6 inches long.
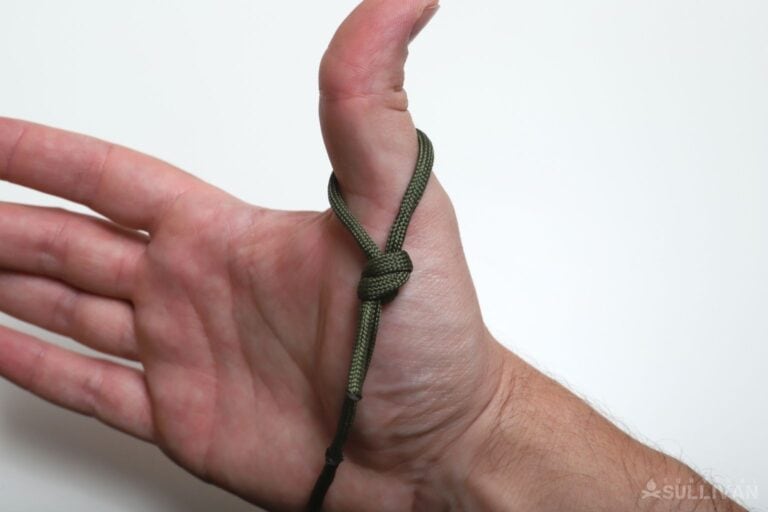
Step 19: Form thumb loop. Taking the bend, form a loop in the doubled cord and make a simple knot as shown.
Step 20: Tighten knot. Cinch down the knot, making sure your thumb can fit inside. IMG_1062.
Step 21: Check for fit. You should be able to slip your thumb in and out of the loop easily, but it should be snug enough that it won’t slide right off on its own. Don’t make it too tight! IMG_1043
Step 22: Tie knot in opposite end for grip. Now, on the opposite end of the sling, tie a simple knot near the very end of the cord. This will serve as a grip that will allow you to release the projectile in use. IMG_1044
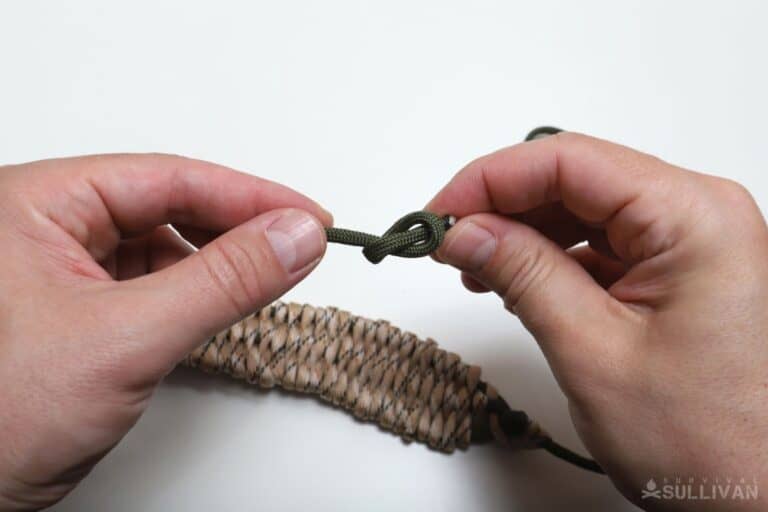
Step 23: Trim and seal excess, if desired. Now with all of that done, go around to the exposed ends on each piece of cord.
You can trim back any tails that are overly long and might interfere with use or be uncomfortable. Then use your lighter to melt and seal the edges, making sure to press them shut while they are still molten. This will prevent fraying and extend the lifespan of your sling.
Step 24: Done! You’re finished! Your sling is now ready for use.
Video of the Process
Here’s a video we made a while back where we used only one piece of cord. The second difference from the pics in the tutorial above is we pulled out all of the inner strands out of the paracord. We only used the sheath for our sling.
Check out the video below:
Now, when removing those inner strands, resist the urge to try to rip it out all at once because the paracord will pigtail and then you’ll have to laboriously smooth it out to get it going again.
Remove the strands from both the 8-foot piece and the 6-foot piece. Discard the inner strands or save them for another project.
Using Your Shepherd’s Sling
Loading and using a shepherd’s sling is really easy, but getting good with it takes a lot of practice so you better get to it!
For starters, put the thumb loop over your thumb in your dominant hand with the cord running along the underside of your thumb.
Next, bring the opposite end of the sling, the one with the little knot in it, to that same hand and secure the knot in your grip. There are various methodologies to doing that that we won’t get into here, but for starters, you can grip it under your index finger or even under the tip of your thumb against the side of your index finger.
Then, load your projectile in the pouch—stone, marble, shot, ball bearing, chunk of ceramic, etc.—as it is hanging down in front of you.
From there, gently swing the pouch to your non-dominant side to start imparting a little centripetal force to the projectile and then one smooth motion brings it up over your head and start whirling it like a helicopter. If you are right-handed, you should be swinging clockwise if you look up.
Keep that up then when you’re ready to loose the projectile, you bring your arm forward like you’re throwing a spear during the outbound part of the motion and then release the short end of the sling. This will open the pouch and let the projectile fly! Like I said, very easy to do but difficult to master! Keep at it, and you’ll be a pro in no time.

The post How to Make a Shepherd’s Sling from Paracord appeared first on Survival Sullivan.
By: Tom Marlowe
Title: How to Make a Shepherd’s Sling from Paracord
Sourced From: www.survivalsullivan.com/make-shepherds-sling-from-paracord/
Published Date: Mon, 03 Feb 2025 10:31:19 +0000
------------------------
Did you miss our previous article...
https://bushcrafttips.com/bushcraft-news/asp-defender-oc-spray-review
 What is BushcraftSurvival SkillsToolsVideosBushcraft CampsBushcraft KitsBushcraft ProjectsPrivacy PolicyTerms And Conditions