Humans are apex predators, but you’d never know it by looking at us. In comparison to other predatory species, we’re feeble, slow-moving, and physically defenseless. We don’t have the strength and resilience of a bear, the flesh-ripping claws and teeth of a tiger, or the speed and agility of a hawk. Most importantly, our senses are extremely limited. Our sense of smell pales in comparison to nearly all apex predators, as does our hearing. Even our eyesight, which is quite sharp compared to other mammals, becomes nearly useless in dark conditions. But our true superpower — intelligence — has allowed us to overcome every one of these weaknesses through technological advancements.
In previous articles, we’ve discussed a variety of magnified optics that help us see further, and night vision devices that allow us to see in darkness. Both of these amplify and augment the natural capabilities of our eyes. In this article, we’re looking at a third category of optics that offer the ability to see something our eyes can’t detect at all: heat. Thermal optics give us a view of the world that other predators would surely envy, instantly highlighting the body heat (infrared radiation) of our prey.
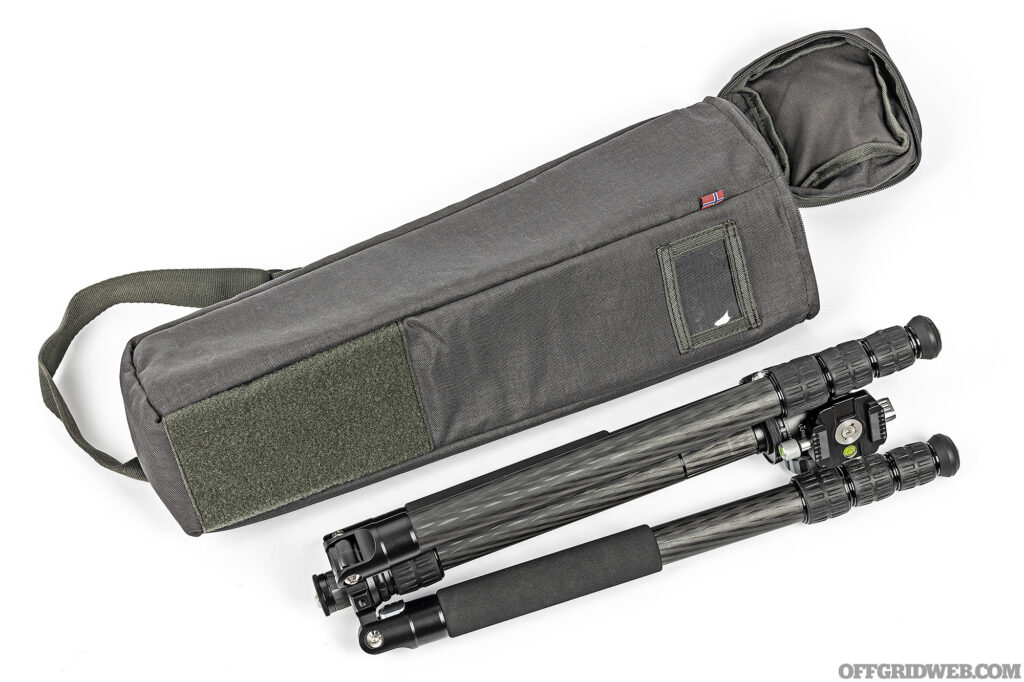
Above: Norwegian precision rifle shooters at Ulfhednar designed the lightweight carbon-fiber tripod we used with our thermal-equipped rifle, as well as a padded rifle bag to protect all our expensive hardware.
Thermal Optic Advantages
The ability to see heat, or the lack thereof, has many valuable applications. It’s an incredibly powerful tool for search-and-rescue operations, whether it’s being used to track a criminal from a police helicopter, locate a missing hiker in the wilderness, or even find a lost pet. Thermal optics aren’t only capable of identifying body heat — they can also be used to determine if a vehicle was driven recently based on the heat of the engine block, or to detect water leaks inside the walls of a home. For these purposes, a handheld thermal camera or monocular may be most convenient (and most cost-effective).
However, for the average end user, hunting is arguably the most rewarding application of thermal devices. The majority of prey animals have developed camouflage to blend into their environments, but that camouflage won’t matter in the slightest when you’re using a weapon-mounted thermal optic. Even if your view is partially obscured by foliage, the telltale body heat shines clearly through, and any movement of that heat signature is immediately visible. It’s so effective that several states have made it illegal to possess thermal optics while hunting (be sure to check your local laws).
Unsurprisingly, this also makes thermal optics a powerful tool for warfare. We’ve seen an increasing number of photos and videos from places like Ukraine that depict the brutal effectiveness of thermal optics on the battlefield. Enemy combatants may be visually concealed and motionless within a treeline — completely invisible to the naked eye or night vision devices — but a thermal optic can make their position crystal clear. While it’s possible to conceal a human body’s thermal signature with Mylar foil, a heat-resistant cloak, or even a wet blanket, it’s much more difficult to do so while moving and/or shooting.
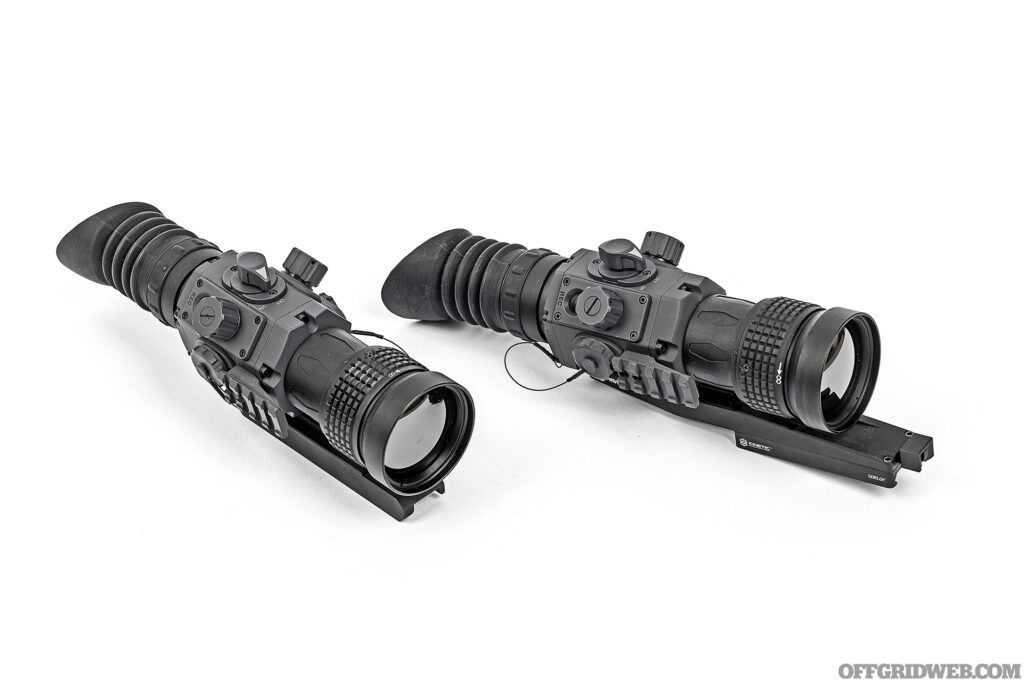
Above: The Contractor 320 (left) and 640 (right) look nearly identical, with the exception of the 640’s KDG Sidelok quick-detach mount.
Types of Thermal Optics
- Handheld: These include pocket-sized monoculars, binoculars, and various types of thermal cameras. They’re used for general-purpose applications such as search and rescue, tracking, and home inspection.
- Helmet-Mounted: Looking for the functionality of a handheld thermal optic plus hands-free convenience? If so, consider one of these. They can be used on their own, or on a “bridge” alongside a night vision monocular. However, unlike analog night vision tubes, most thermal optics have a noticeable latency effect that some users may find disorienting or uncomfortable for prolonged use, especially while walking or tracking moving objects.
- Clip-On Weapon Sights: If you have a rifle that’s primarily set up for daytime use but would like to add thermal capabilities for certain occasions, consider a clip-on. This optic attaches directly in front of your weapon’s existing optic, showing a thermal image behind your rifle’s existing scope reticle. This also allows you to retain your weapon’s zero setting. Be sure to confirm that the thermal you purchase is compatible with the mount height/position and base magnification (typically 6x or less) of your daytime optic.
- Stand-Alone Weapon Sights: These are dedicated thermal optics that can be used without a traditional scope. Since there’s no additional glass between your eye and the display, they offer the clearest and brightest image, plus a wide field of view that’s less sensitive to the shooter’s head position. They’re also usually lighter and more cost-effective than setups with a clip-on thermal and a traditional rifle scope.
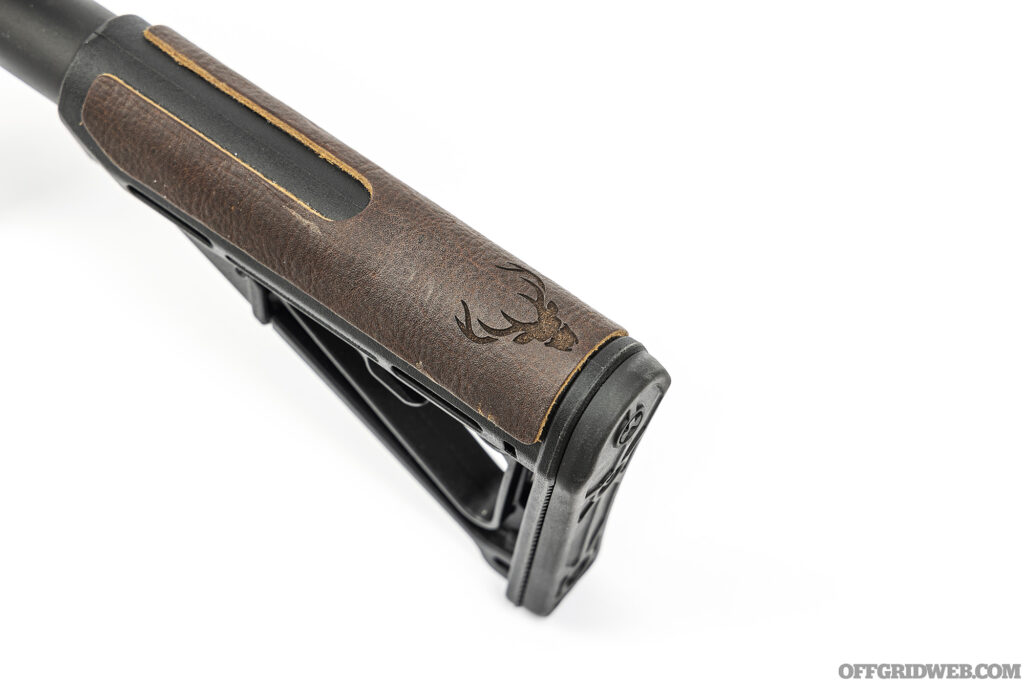
Above: The Stag Pursuit includes a Magpul stock with unique leather cheek pad.
Drawbacks & Considerations
All technology comes at a price, both literally and figuratively. Thermal optics are extremely potent tools, but they also have some drawbacks and challenges you should consider:
- Cost. While basic handheld thermals can be found for less than $1,000, if you want a high-quality weapon-mounted thermal optic, expect to pay at least a few thousand for it. And if you want the latest and greatest high-resolution sensor, expect to spend a lot more — some high-end models exceed $15,000.
- Battery life. It takes a lot of energy to run a thermal sensor, the computer that controls it, and the screen that displays its output. Newer thermal optics have become more efficient, but they still go through batteries fast enough that you should always be carrying multiple spares.
- Latency. Like any digital camera or display, thermal optics have a slight delay between gathering thermal data from the sensor and rendering it on the screen. High-end models have faster processors and better screens that reduce this delay, but it’s always present, even if it’s only a few milliseconds.
- NUC. All thermal sensors need to periodically conduct a Non-Uniformity Correction (NUC, pronounced “nuke”). When a thermal sensor runs continuously, visual noise and imperfections will start to build up within the image; NUCing resets the sensor to a neutral temperature reading, wiping away that noise temporarily. Some thermal optics require the user to manually close the lens cap to NUC, but most use an automatic internal shutter. From the user’s perspective, this appears as an audible click and a sudden freeze of the display.Weapon-mounted thermals typically have a countdown leading up to the NUC, so it doesn’t surprise the shooter and lead to a missed shot. For the first few minutes after the thermal sensor turns on, it’ll need to NUC frequently until it reaches normal operating temperature. After that, the NUC cycle will become less frequent. So, it’s a good idea to let your thermal optic run for a couple minutes and “warm up” before you use it.
- Size & weight. This amalgamation of glass, sensors, electronics, and batteries isn’t as compact as a traditional rifle optic. And once you enclose those fragile components inside a housing that’s durable enough to be mounted on a rifle, it can also be quite heavy.
- Thermal barriers. Heat, much like light, can be blocked or reflected by certain materials. Some materials, like layers of clothing, will simply take time to soak up heat, appearing cool at first and slowly warming up. Others, especially highly reflective materials such as Mylar and glass, will act as an opaque barrier at best or a mirror at worst, reflecting ambient heat back at the viewer.
- Environmental conditions. Since thermal optics display the difference in temperature between a target and its environment, there are some situations where the difference may be so small that the image looks washed-out. For example, if you’re scanning a 100-degree desert landscape for a human’s 98-degree body temperature, it’s going to be much more difficult to see than if that human were standing in front of a snowbank. Granted, thermal optics are sensitive enough to detect minuscule differences in temperature, but a larger temperature difference will produce a clearer, higher-contrast image.
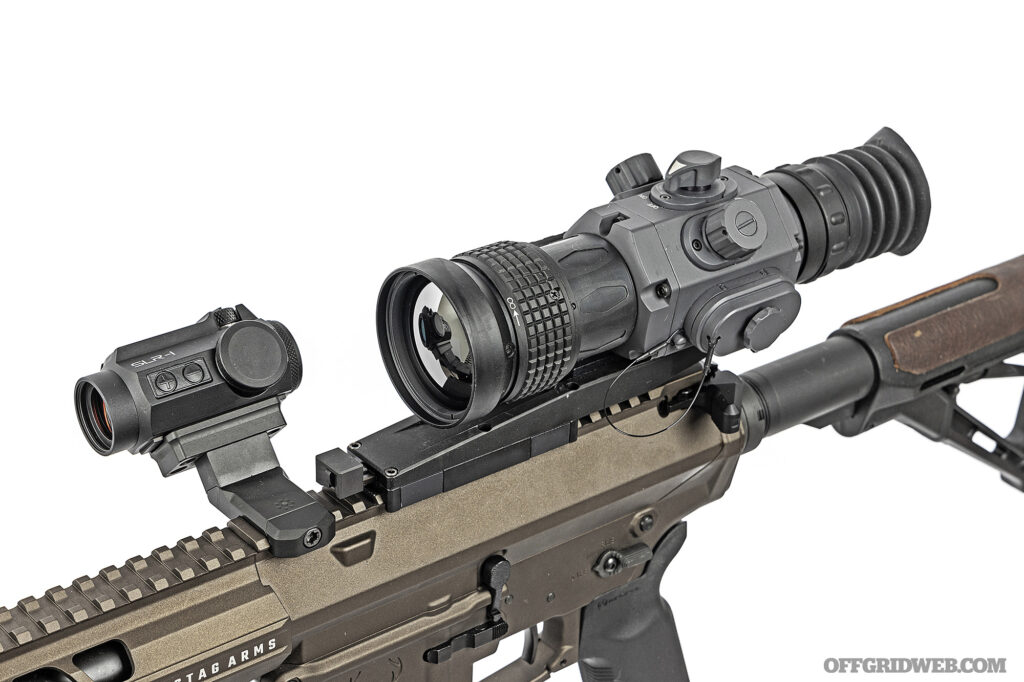
Above: All thermal optics go through batteries quickly, so it’s wise to have a backup sight of some kind. We used an Atibal SLR-1 red dot on a 45-degree Arisaka Defense mount.
Heavy rain and thick fog can also negatively impact thermal optic performance at longer ranges, since the dense water particles in the air absorb and scatter infrared energy before it reaches the sensor. On the other hand, thermal optics can see through some airborne particles that obscure visible light, such as smoke and dust, as long as the particles aren’t large or dense enough to disrupt the infrared radiation. This is why they’re often used by firefighters and rescue personnel in low-visibility environments.
Now that you know some of the advantages, disadvantages, and applications of thermal optics, we’ll share our real-world impressions with two thermal optic models from Armasight.
Armasight Contractor Thermal Optics
In early 2022, Armasight unveiled a new series of weapon-mounted thermals known as the Contractor series. These launched with two models, a 3-12x25mm and 6-24x50mm. Much like traditional rifle optics, the first numbers indicate magnification range — in this case, magnification levels above the base value are digitally magnified, meaning the image becomes less clear (lower resolution) as you zoom in. The millimeter measurement denotes the objective lens size; just as a larger objective lens on a rifle scope allows it to gather more light, a larger thermal lens allows the sensor to take in more infrared radiation for a clearer picture at longer range.
Both of the initial Contractor models used an ArmaCORE 12-micron 320×240 sensor — this is known as the optic’s resolution. We’ll discuss that in more detail later.
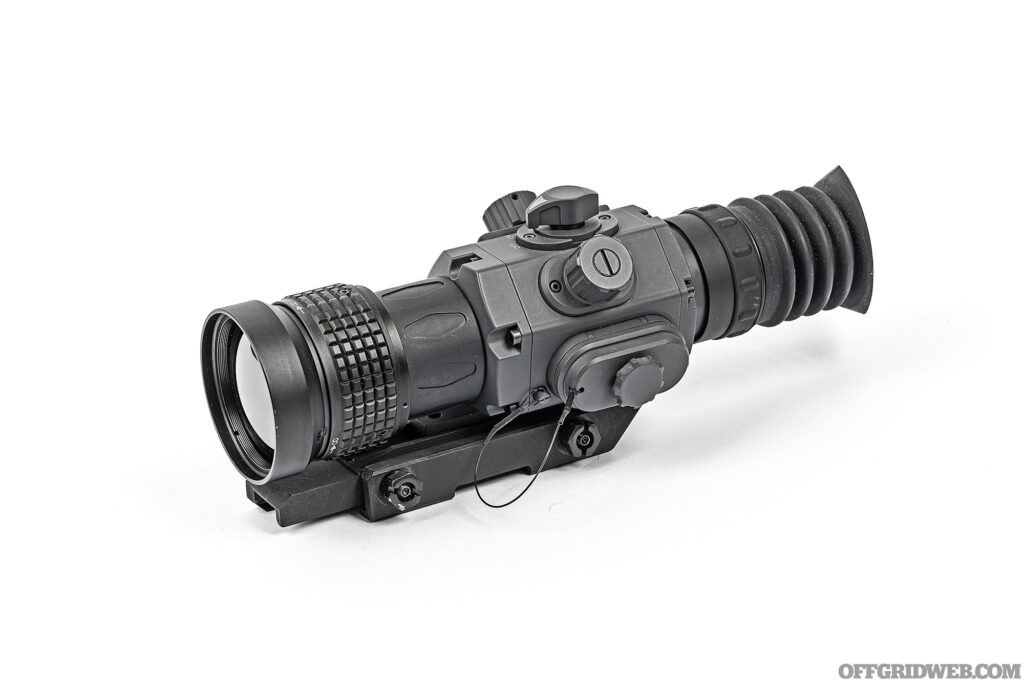
Above: Unlike the quick-detach mount on the 640 models, the Contractor 320 includes a basic Picatinny rail mount that must be installed onto your rifle with a wrench.
Contractor 320 6-24x50mm
We began by testing the higher-magnification Contractor 320 thermal sight, which has a 6x base magnification and an MSRP of $4,399. This optic is built into a rugged, IP67 water- and dust-proof metal housing with large, tactile controls that can be operated easily with gloved hands. Focus and diopter adjustment are both manually controlled via textured rings on the housing, ensuring the user can get a crisp image at all times. The 1024×768 AMOLED display is colorful and bright, with a responsive 60Hz refresh rate. It's powered by two CR123 batteries, with an approximate run time of 4 hours at 68 degrees F. Like we said, thermals eat batteries quickly, and this is actually a respectable run time compared to some of its competitors.
The Contractor also has a sophisticated suite of color palettes, image enhancement modes, and extra features. These include:
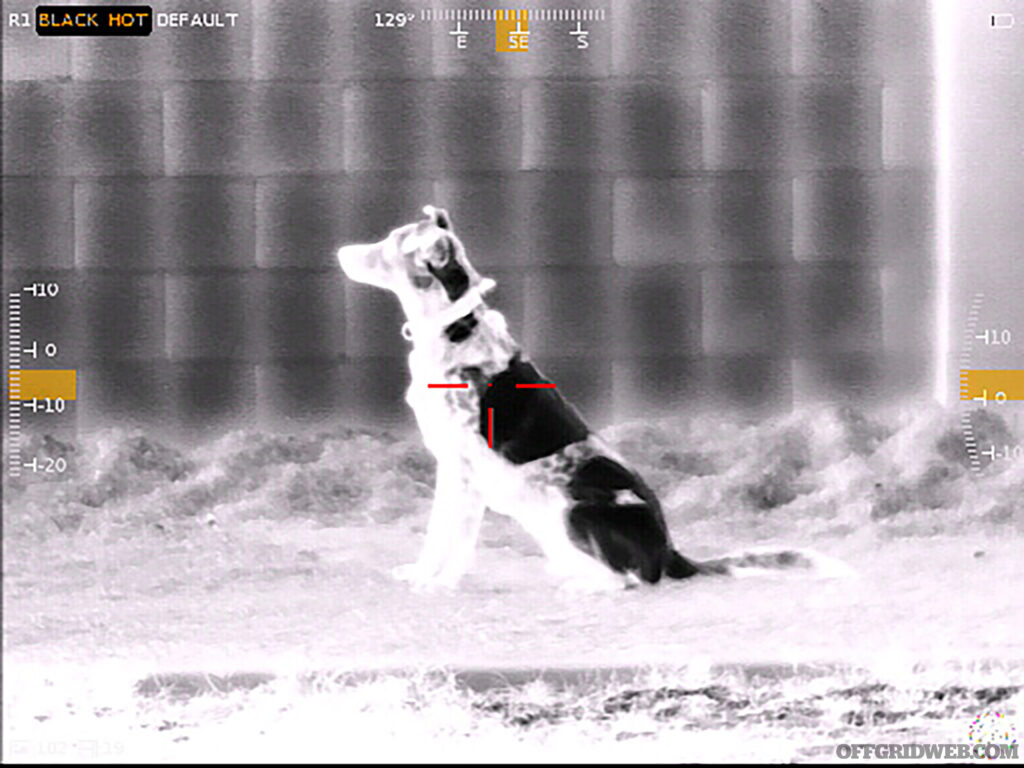
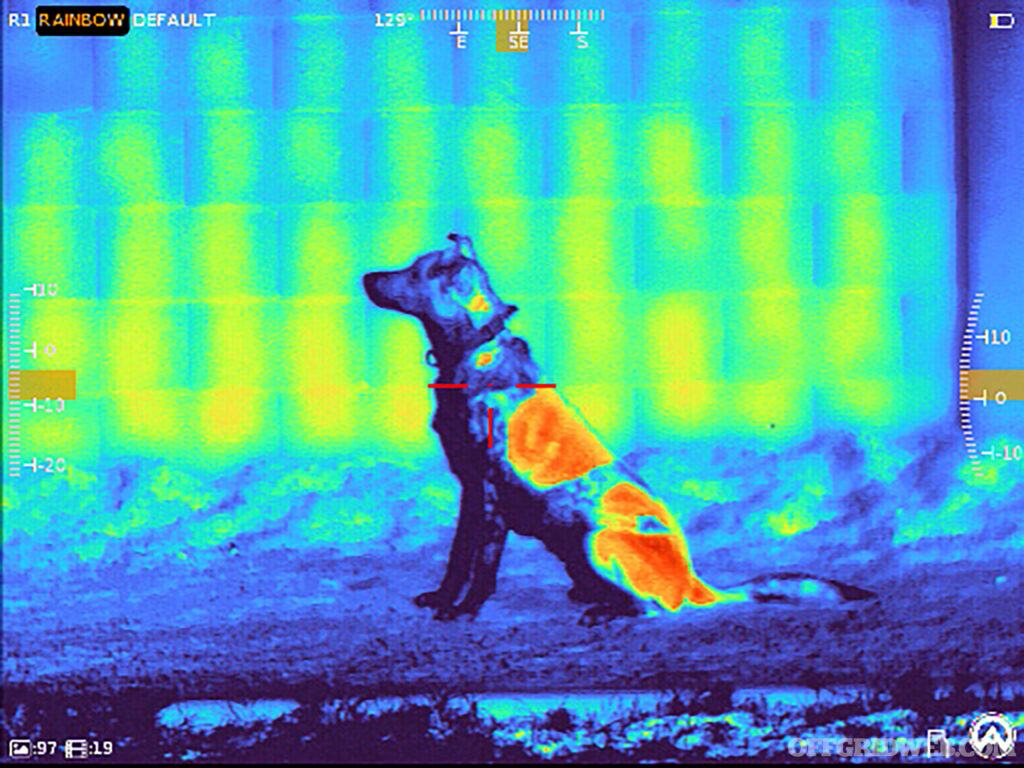
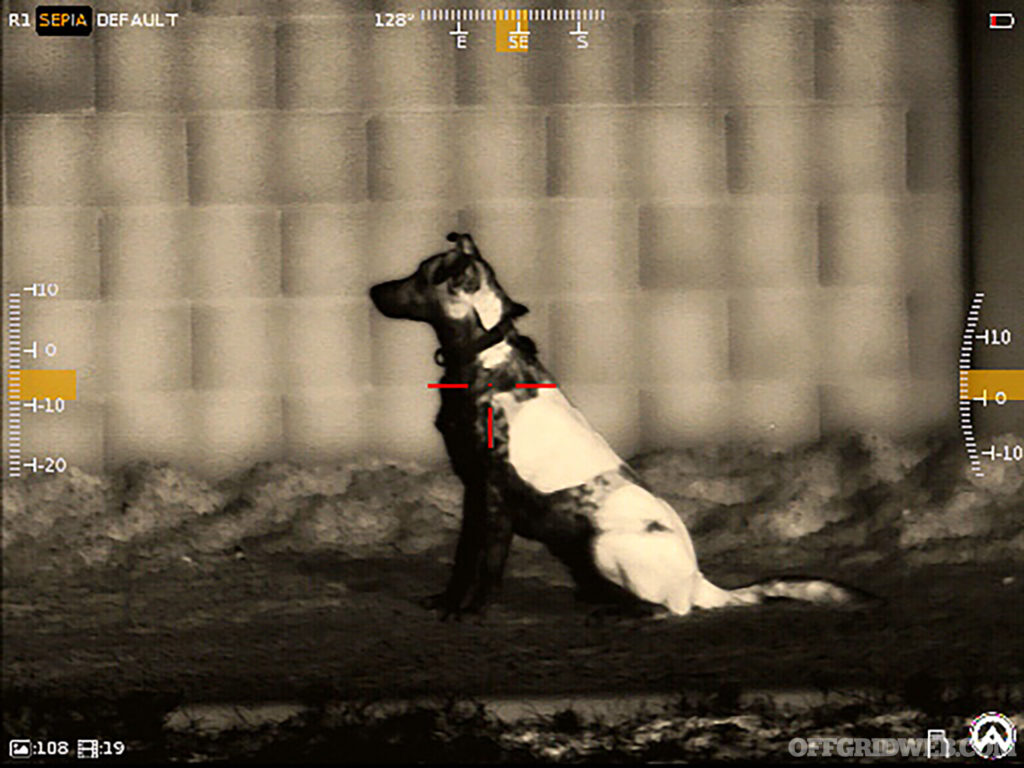
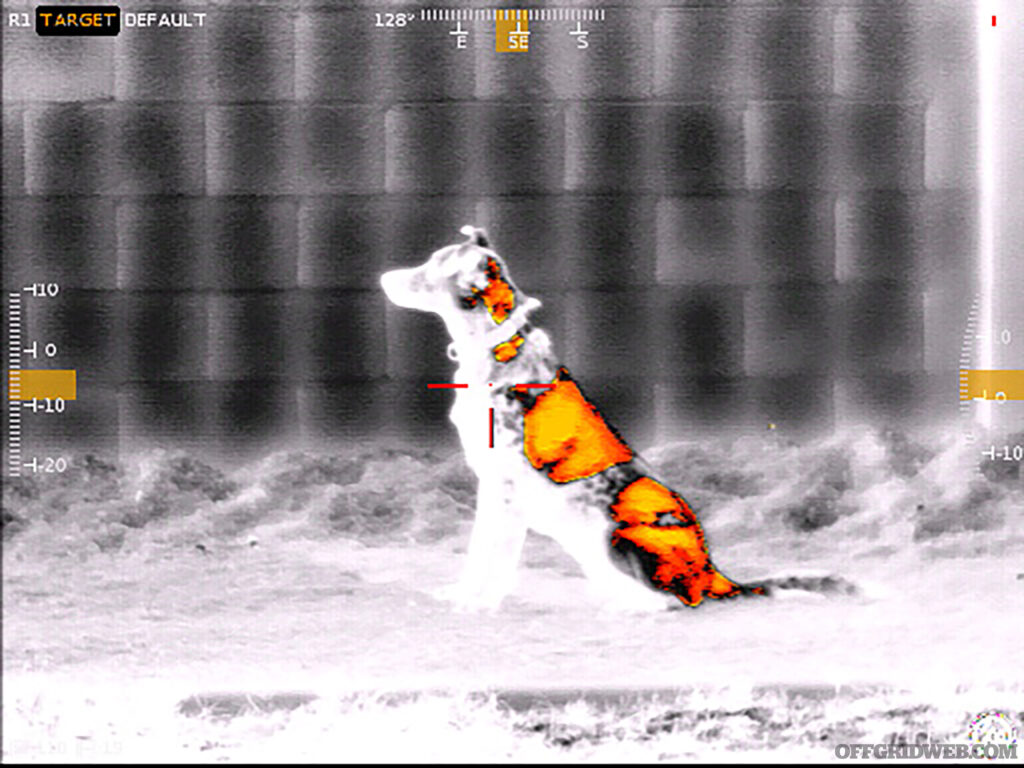
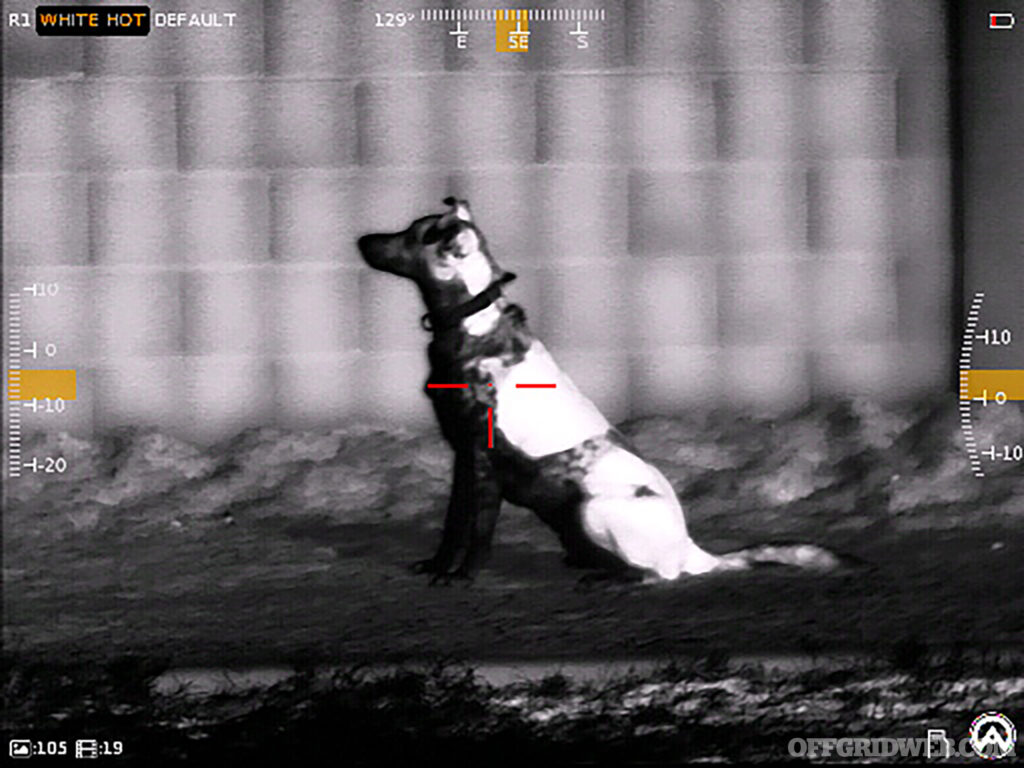
- Five palettes: white hot, black hot, target, rainbow, and sepia
- Detail enhancement/sharpening settings: default, forest, detect, indoors, and sky/sea
- Eight reticle types with adjustable colors and 1/2 MOA elevation/windage adjustments
- On-screen compass, level, inclinometer, angle cosine indicator, and optional stadiametric rangefinder
- Picture-in-picture mode
- Video streaming and data transfer via USB or Wi-Fi
- Bluetooth connectivity with iOS and Android apps
- Manual or shot-activated video recording and image capture
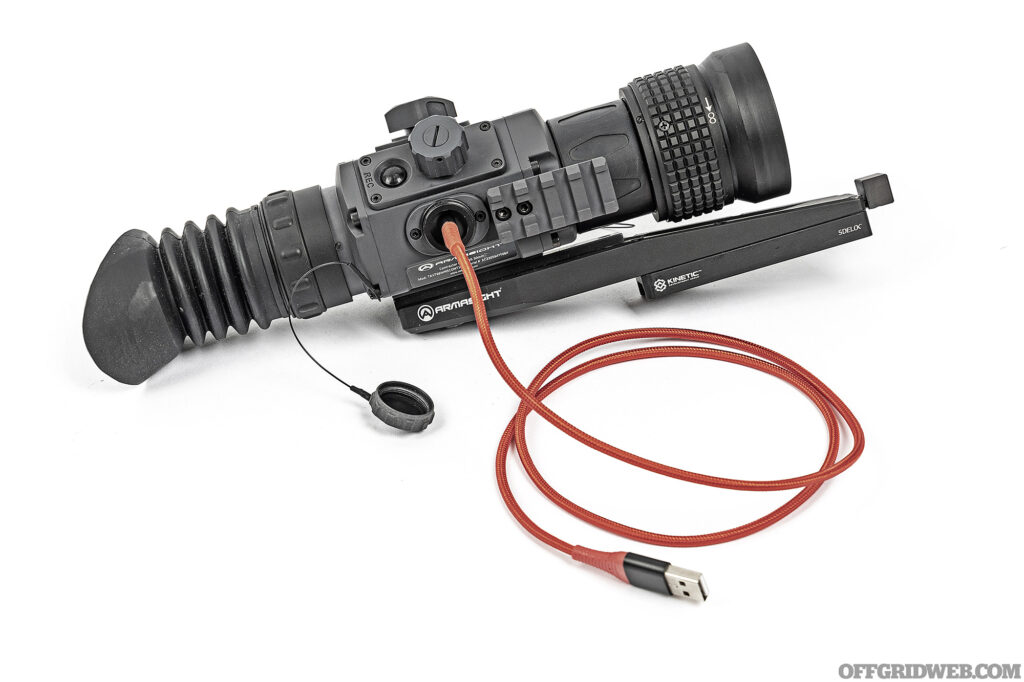
Above: A weatherproof cap covers the USB-C port used for streaming or data transfer from the onboard storage.
Contractor 640 3-12x50mm
About a year after the release of the Contractor 320, Armasight unveiled its big brother: the Contractor 640 family. These optics use the company’s proprietary ArmaCORE 12-micron sensor, but now with 640×480 sensor resolution — double that of the 320 series. Three Contractor 640 models are available, ranging from a compact 2.3-9.2x35mm model to a 4.8-19.2x75mm monster. We decided to test the Contractor 640 3-12x50mm, which has the same objective lens size and housing size as the 320 model we’re comparing it to.
The Armasight Contractor 640 3-12x50mm has an MSRP of $5,799, which is $1,400 more than the Contractor 320 6-24x50mm. Its features are nearly identical to the 320, with the same display, run time, color palettes, and so on. Aside from the sensor itself, the most notable difference is the mount. Unlike the 320, which features a standard Picatinny rail mount, the 640 series comes with a much more convenient Kinetic Development Group Sidelok quick-detach mount.
So, is the 640 sensor resolution and QD mount worth the price increase? More importantly, is either optic worth thousands of dollars of your hard-earned money? These are questions we aimed to answer, no pun intended.
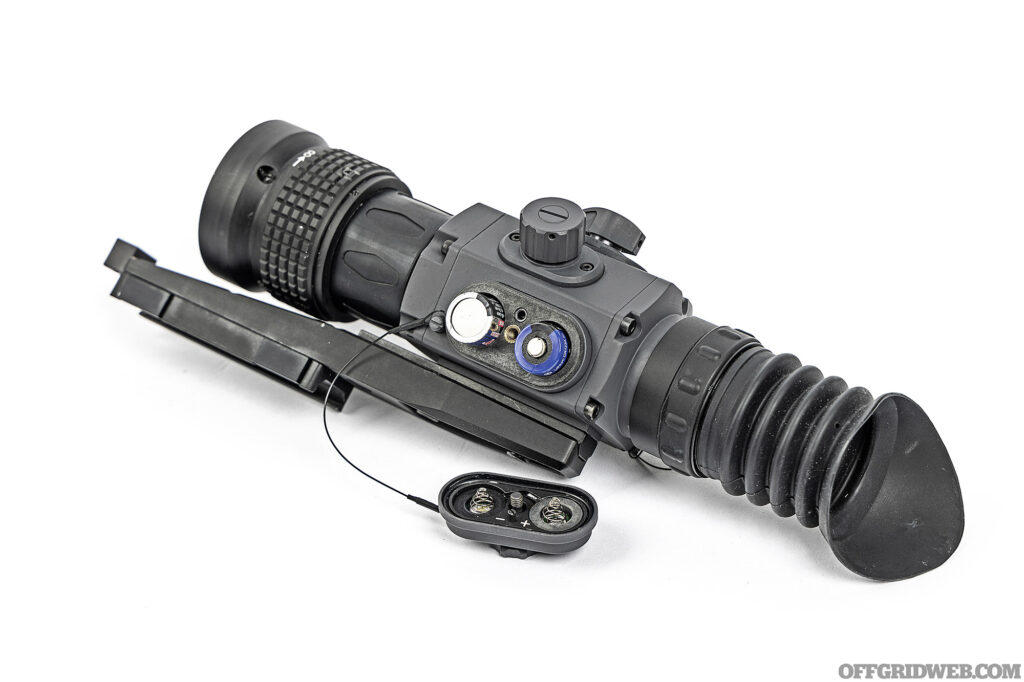
Above: A weatherproof cap protects the battery compartment and its two CR123 batteries.
Armasight Contractor Color Palettes
Here’s a quick comparison between the Contractor 640’s color palettes. Notice how black patches on the dog’s fur appear warmer than light patches. This is a result of absorbing more heat from the sun. (Don’t worry, no dogs were harmed in the making of this article.)
The Test Platform: Stag Pursuit 6.5 Creedmoor AR-10
To put these thermal optics through their paces, we chose a suitable test rifle from Stag Arms. The Stag 10 Pursuit is the company’s first product line designed specifically for hunting and is available in 16-inch .308 or 18-inch 6.5mm Creedmoor variants. We chose the latter, since we already had a healthy stockpile of Norma 6.5 ammo from the long-range rifle class we wrote about in Issue 55.
The Stag 10 Pursuit comes in an elegant Midnight Bronze Cerakote finish with several upgrades out of the box: a two-stage Timney trigger, Magpul K2+ increased-angle grip, ambi 90/45-degree safety selector, ambi Breach charging handle, and Magpul CTR stock with a Stag-branded leather cheek pad.
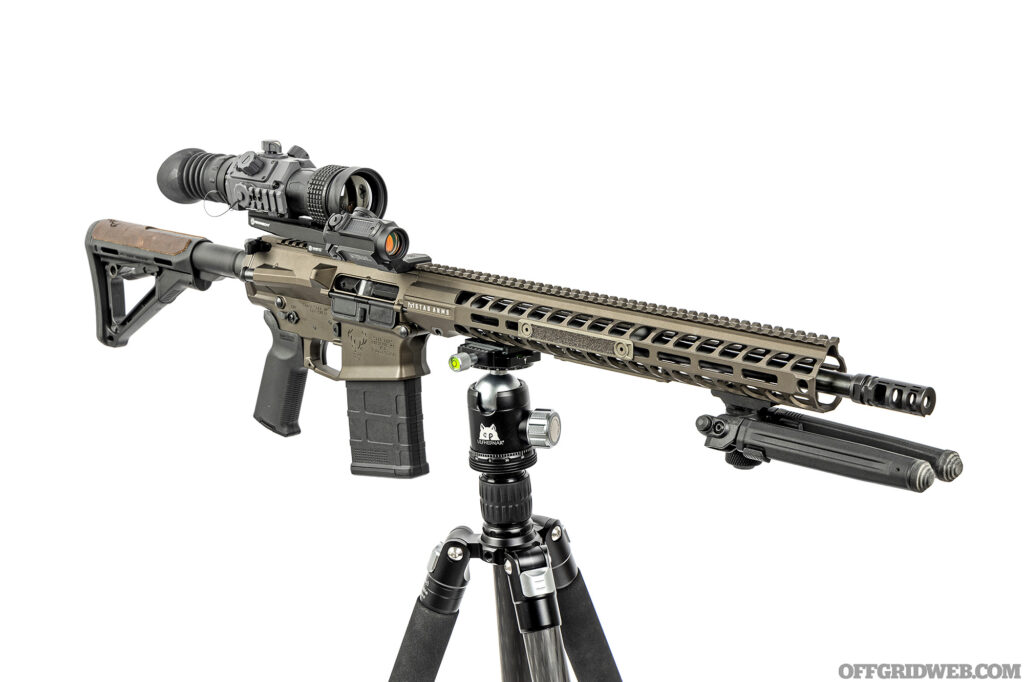
We can rarely leave a rifle unmodified, so we installed a few accessories. A stable shooting platform is critical for any long-range or hunting rifle, so we added a Magpul bipod and an M-LOK to ARCA rail adapter from Ulfhednar. The former accommodates traditional prone shooting; the latter makes it possible to quickly mount the rifle in Ulfhednar’s excellent carbon-fiber tripod for rock-solid shots in a standing or seated position. Walker Defense Research provided a set of FDE-colored NILE silicon carbide grip panels, which offer a more secure grip on the forend, even in wet conditions.
Lastly, every serious rifle needs a backup sighting system — especially when the primary optic depletes its batteries every 4 hours — so we attached an Atibal SLR-1 solar red dot on an Arisaka Defense 45-degree offset optic mount. Although it’s possible to mount a red dot on the Contractor’s side accessory rail, that mounting point is better suited to a laser rangefinder. Plus, this way our backup red dot stays zeroed even if we remove the thermal.
Ulfhednar also provided a padded, dual-purpose gun cover/shooting mat that allows us to keep our rifle protected on the way to the range and shoot comfortably from the prone position once we arrive.
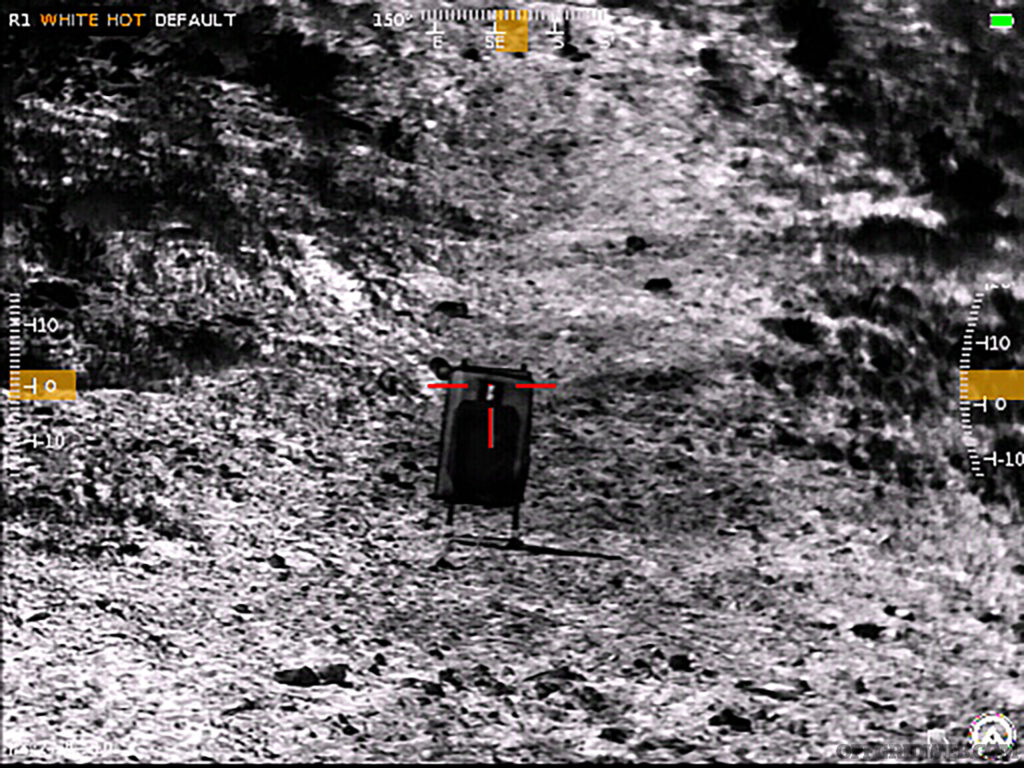
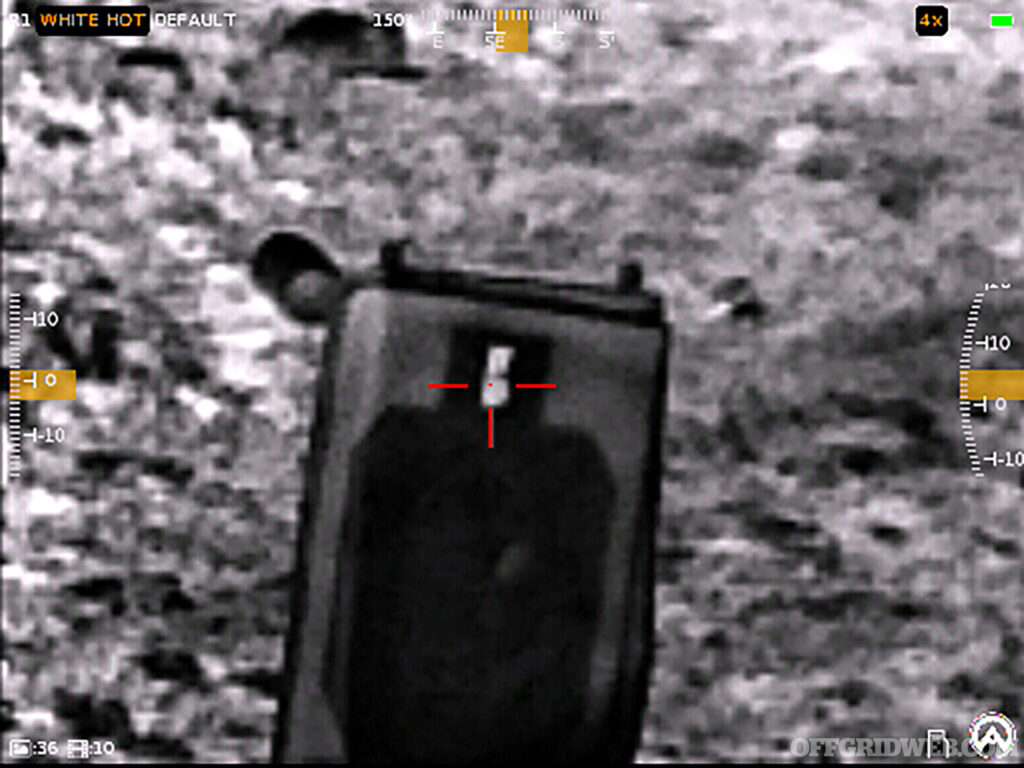
Above: A 2-inch-wide strip of foil tape was clearly visible at 50 yards through the Contractor 640 at base 3x magnification. After dialing up to 12x digital zoom, a dark spot is visible where bullets impacted the foil.
In the Field
Before testing each of the Armasight thermal optics, we needed to zero them — if you’ve never done this with a thermal before, it’s not as hard as you may think. Armasight provides a foil-backed zeroing target with each optic, but the DIY method is to buy a roll of aluminum foil tape at your local hardware store; either way, just attach the thermally reflective target to some cardboard and set it at the desired distance. Heat from the sun will cause it to appear as a light (or dark) spot in the optic’s display. Then, open the Contractor’s boresight menu to adjust the crosshair to match the bullet’s point of impact.
We used the Contractor 320 and Contractor 640 optics in the hot desert at midday, on cool evenings, and even indoors. Once we dialed in the focus to the appropriate setting, each produced a crisp image that clearly displayed the heat signature of field mice, birds, dogs, and humans, as well as inanimate objects like cars — obviously, we removed the optic from our rifle before aiming it at anything we weren’t planning to shoot.
Motion appears smooth and fluid through these optics, and although there’s a slight perceptible delay — as with all digital optics — it’s only noticeable if you’re looking for it. Unlike some lower-end thermal optics or digital night vision devices, the Contractor didn’t leave us feeling seasick and disoriented after tracking moving objects. The 60Hz AMOLED display does a great job of rendering the data from the sensor, and it’s easily bright enough to be comfortable during the day.
The controls are also straightforward: the right knob controls digital zoom, and the left knob controls color palettes and enhancement modes. A large locking power switch on top of the housing turns the optic on and off, and a recessed button behind the right knob captures photos (long press) and videos (short press). Thousands of photos or up to 4 hours of video can be saved to the onboard storage. Once you’re back home, you can upload them to your computer via a USB-C port that’s hidden under a screw-down cap on the right side of the housing.
Although these thermal optics are undeniably bulkier than a traditional rifle scope, they’re not much heavier. Each Contractor optic, including batteries, weighed between 2 and 3 ounces more than a Leupold Mk8 CQBSS 1-8x24mm optic in a Badger Ordnance mount. That’s a negligible amount of weight for such a huge difference in capabilities.
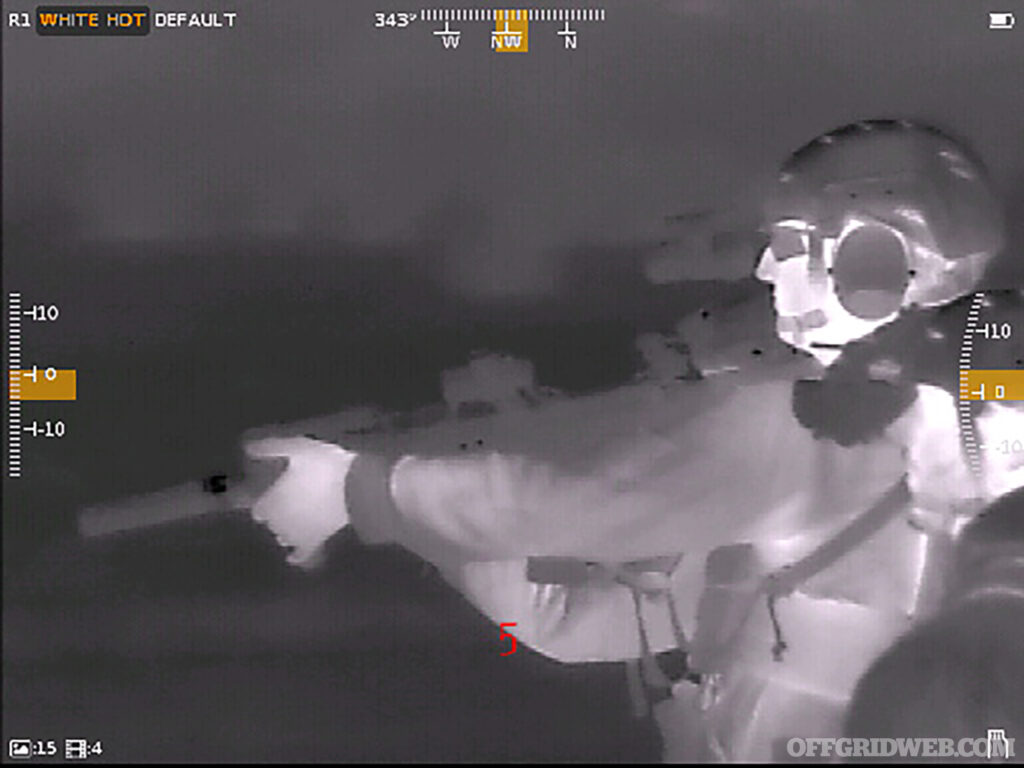
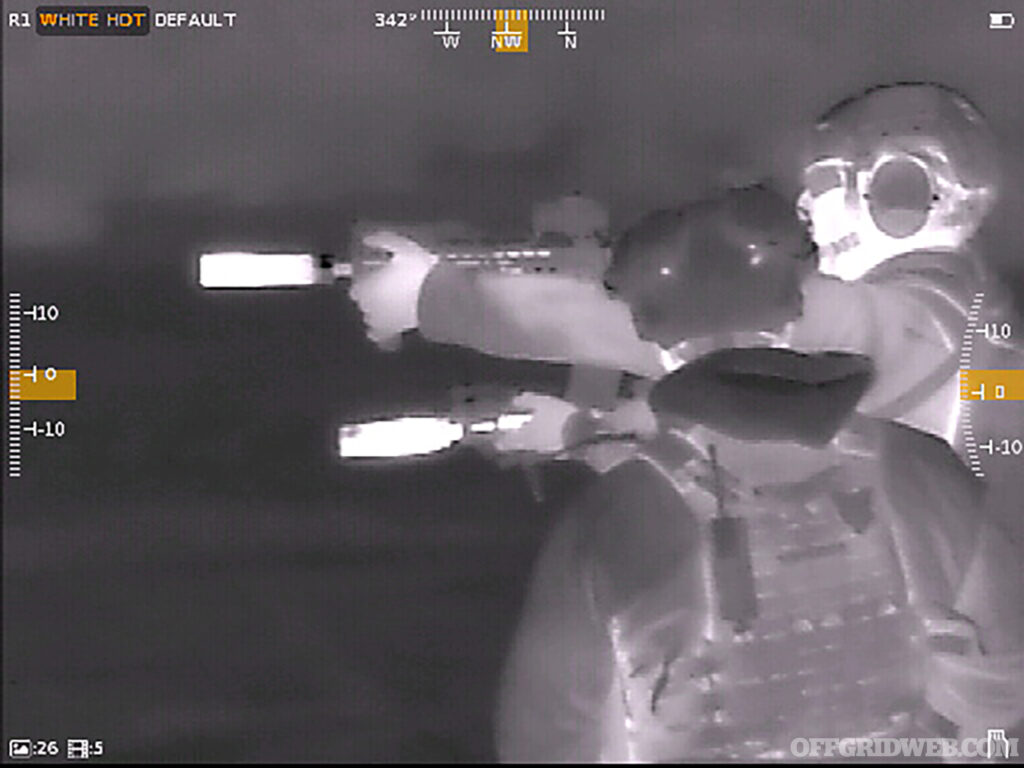
Above: Can you tell the difference before and after shooting? The rifle’s suppressor and barrel glow brightly as they heat up. (Contractor 320)
A Note About NUC
As mentioned earlier, you’ll definitely want to let these optics warm up before attempting to shoot. After a cold start, the NUC feature kicks in about every 10 seconds, displaying a 5-4-3-2-1 countdown on the screen before freezing momentarily to wipe the sensor. It’s possible to shoot during this warm-up cycle, but you need to time your shots carefully within those 10-second windows.
The NUC can also be delayed by pressing the right control knob during the countdown, but that only delays it for one cycle and results in a continued degradation of image quality. Thankfully, once the Contractor optics have run for about 15 minutes, image quality stabilizes and NUCs become rare enough that you’ll hardly notice them anymore.
320 or 640?
So, how much of a difference is there between the Contractor 320 and Contractor 640? Placing them side by side, the image difference is obvious. The 640×480 resolution is significantly more detailed, picking up more texture on objects and sharper edges. The less expensive 320×240 sensor produces an image that still makes it easy to identify heat signatures — you’d have no problem at all using it to spot the outline of a hog or coyote — but details often appear fuzzy or blotchy.
Granted, the two optics we tested have different base optical magnification levels (3x and 6x) so it’s difficult to rule out all other variables for a perfect one-to-one comparison. We did notice that using the Contractor 640 (3x base power) at its 2x digital zoom setting puts it at the same working resolution as the Contractor 320 at base 6x magnification. In this way, the 640 sensor has a much greater usable range than the 320 — at base magnification, it’s incredibly clear, and even when it’s zoomed in to 2x, the image is still quite good.
With the 320, on the other hand, targets become much less defined at the 2x zoom setting. And when you crank it up to 4x zoom — the equivalent of 24x total magnification — you’re effectively working with a data source that’s only 80×60 pixels. It’s still usable, but it’s not ideal.
If you’re planning to use digital zoom frequently or spend hours looking through your thermal optic, we’d say the Contractor 640 is well worth the extra cost. It’s easier to make out fine detail and has more “zoom headroom” than a lower-res sensor, but maintains the same housing size, weight, and run time as the 320. The quick-detach mount is also a valuable upgrade. That said, the Contractor 320 is a solid choice that will easily meet the needs of most hunters. Also, MSRP for the 320 has dropped $400 since its release in 2022, so there’s a good chance it will continue to become a more affordable choice in the future.
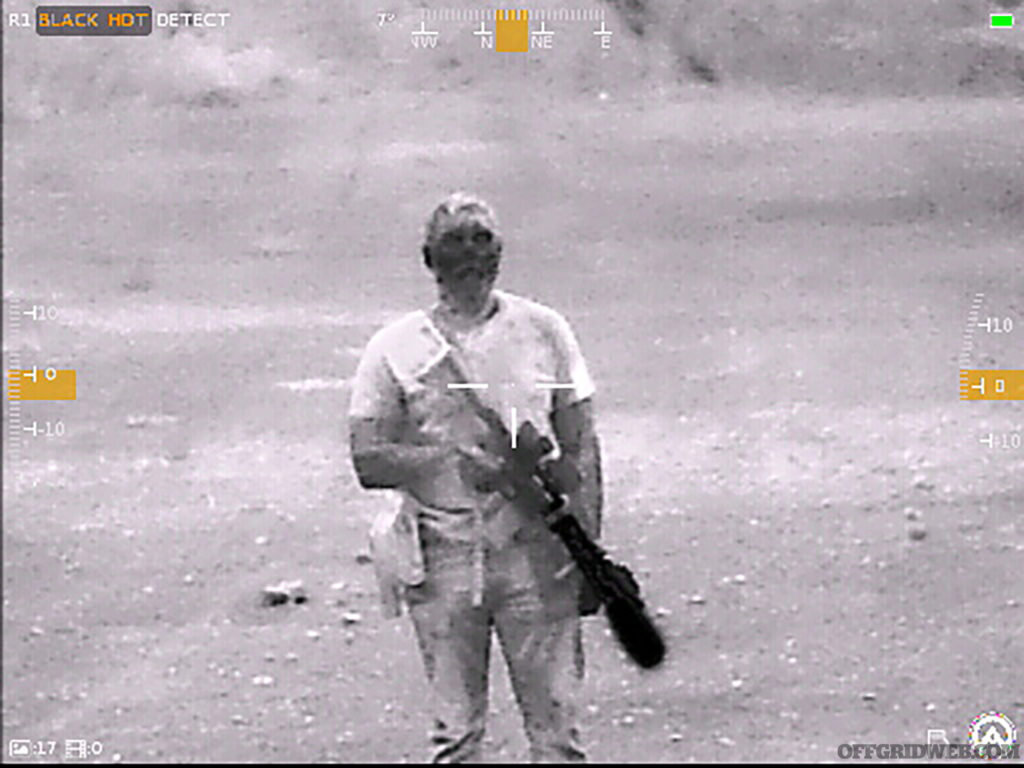
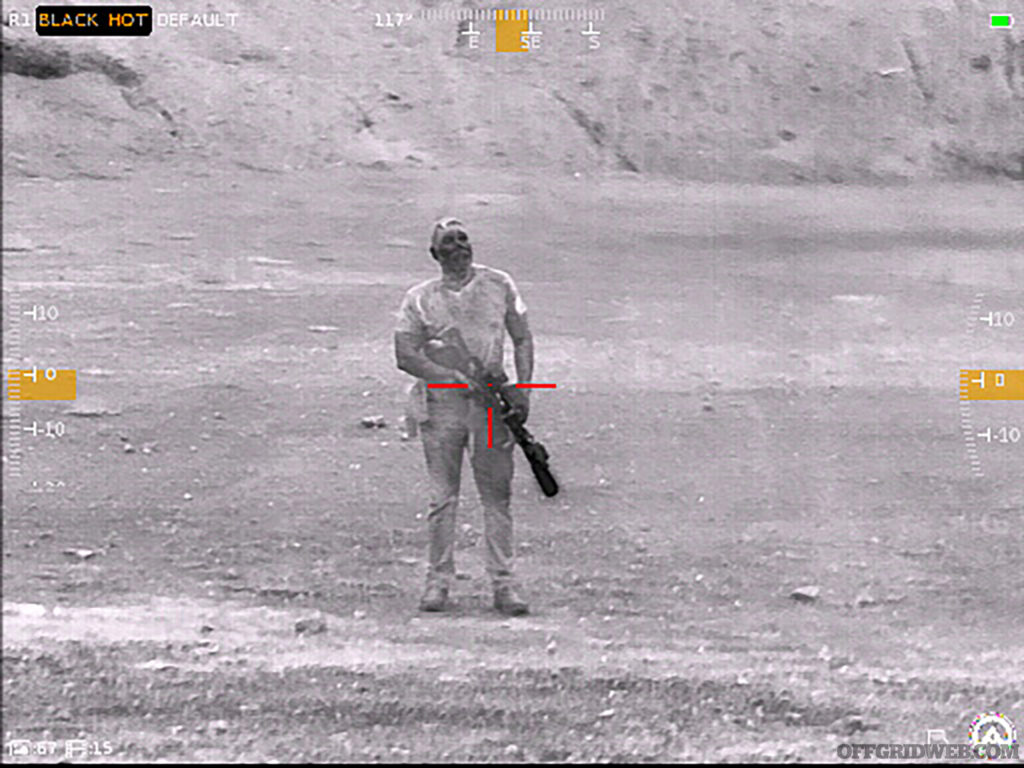
Above: Here’s a direct comparison of the Contractor 320 (top) versus the 640 (bottom). Both show the subject clearly, but we preferred the less fuzzy image produced by the 640 as well as the wider field of view from its base 3x magnification.
Closing Thoughts
There’s a reason the otherworldly hunter in the classic movie Predator was shown using advanced thermal vision to find his prey — nothing makes it easier to stealthily track a warm-blooded target. Every animal and human hunter understands the importance of visual camouflage, and it’s a skill that’s been honed through thousands of years of natural selection. However, very few species are capable of concealing their heat signature. Even if you stand perfectly still in total darkness, you’ll light up like a Christmas tree through a thermal optic, and you won’t know you’re being watched until it’s already too late.
Armasight’s Contractor series offers impressive capabilities and a wide range of features that’ll make you feel like a supernatural hunter, spotting every living thing that crosses your path from 1,000 yards or more. Whether you choose a 320 or 640 sensor with high or low base magnification, thermal optics give you the ability to see what would otherwise be invisible — that’s about as close to a superpower as you can get for a few thousand dollars.
Pair one of these optics with a nice rifle like our Stag 10 Pursuit and a stable tripod, and your prey won’t know what hit ’em. Better yet, pair all that with a helmet-mounted night vision setup like the one we reviewed in Issue 58, and you’ll be able to stalk your prey in total darkness before switching to your thermal to take the shot.
Sources
Read More
Subscribe to Recoil Offgrid's free newsletter for more content like this.
Editor's Note: This article has been modified for the web.
The post Hot On The Trail: Testing Armasight’s Thermal Optics appeared first on RECOIL OFFGRID.
By: Patrick Diedrich
Title: Hot On The Trail: Testing Armasight’s Thermal Optics
Sourced From: www.offgridweb.com/gear/testing-armasights-thermal-optics/
Published Date: Fri, 19 Jan 2024 12:00:25 +0000
------------------------
Did you miss our previous article...
https://bushcrafttips.com/bushcraft-news/9-emp-movies-to-inspire-you-prep-for-an-electromagnetic-pulse
 What is BushcraftSurvival SkillsToolsVideosBushcraft CampsBushcraft KitsBushcraft ProjectsPrivacy PolicyTerms And Conditions
